HaeNaem Co. Ltd
We, Haenaem, have been aiming top priority of high quality, exact delivery date, and credibility
with customer by accumulated know-how for many years.
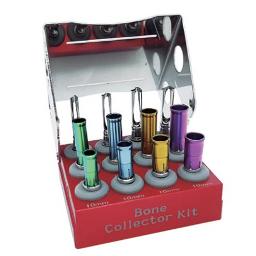
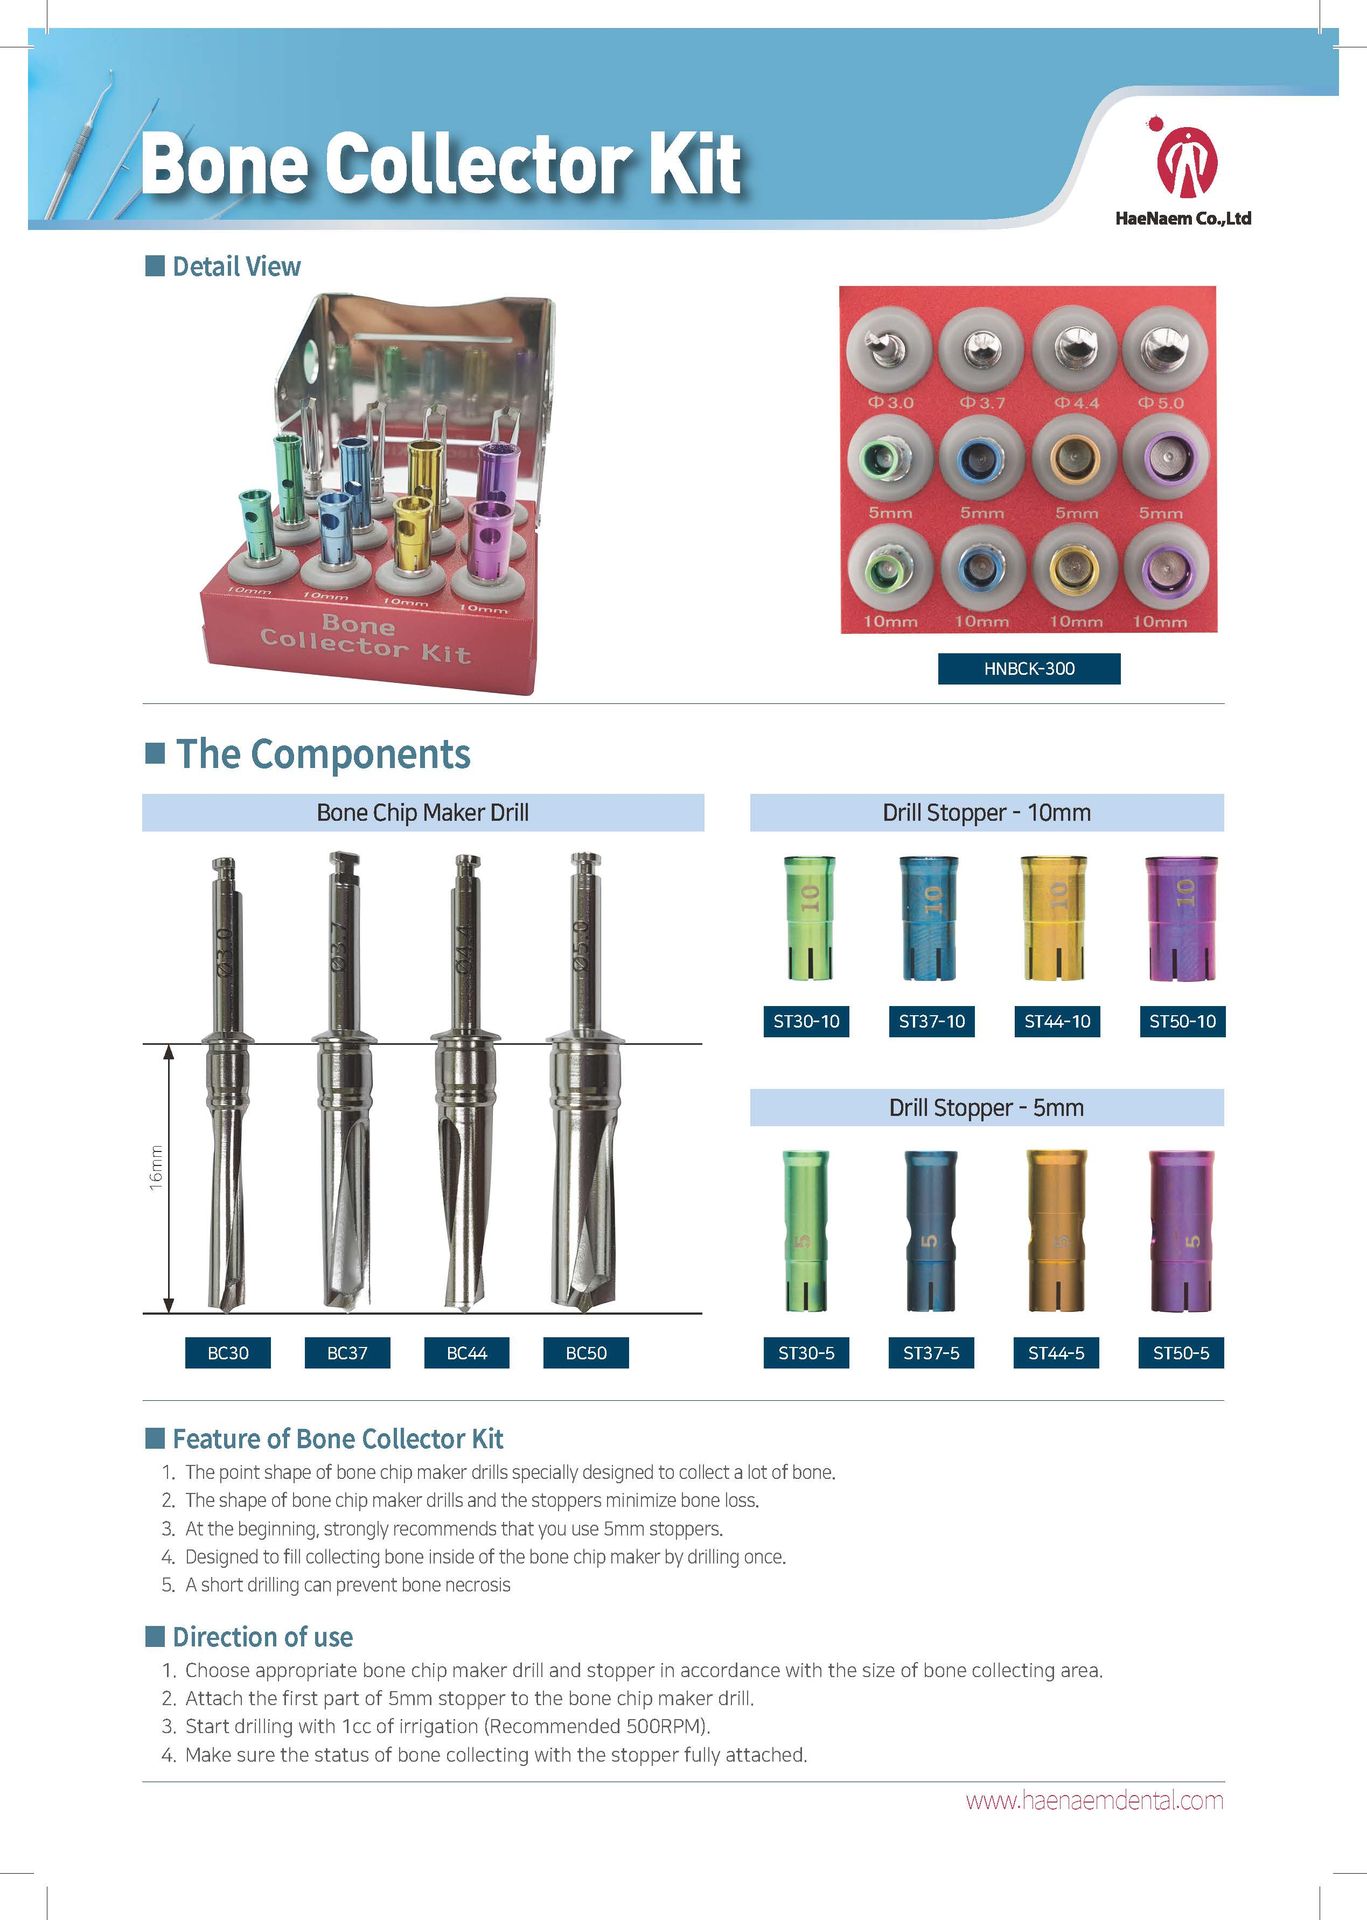
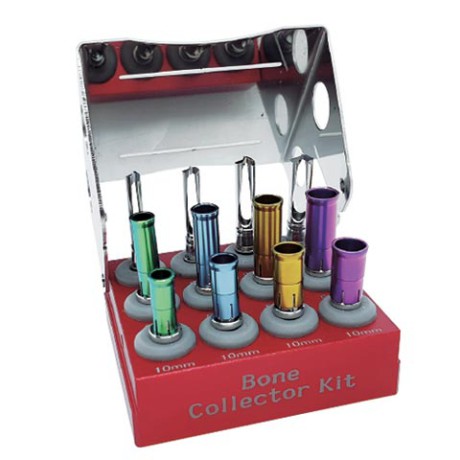
Bone Collector Kit
A kit that prevents bone necrosis
It is designed to fill collecting bone inside of the bone chip maker.
The Components of Bone Collector Kit:
- Bone Chip Maker Drill
- Drill Stopper - 10mm
- Drill Stopper - 5mm
Bone Mill Kit
With this Kit, you can solve foundation hole creation and bone mill at once with only drilling using a combination.
The components of Bone Mill Kit are:
- A Bone Mill Guide Drill
- B-Bone Mill Initial Drill
- C-Peanut Trimmer Drill
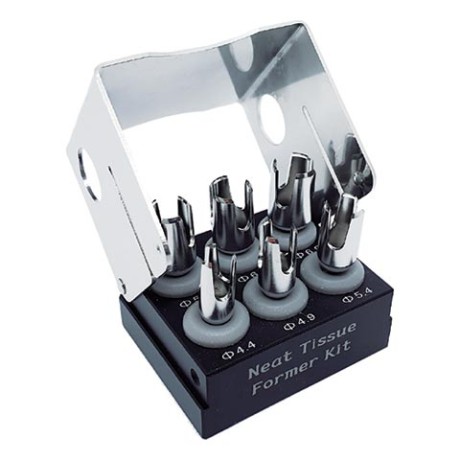
Tissue Former Kit
With this kit, you can reduce the period of the patient.
Providing convenience during the second operation of implant.
The components of Tissue Former Kit:
- NTF445159
- NTF495564
- NTF546069
- NTF596574
- NTF647079
- NTF697584
Tissue Former Kit is available on Total Core
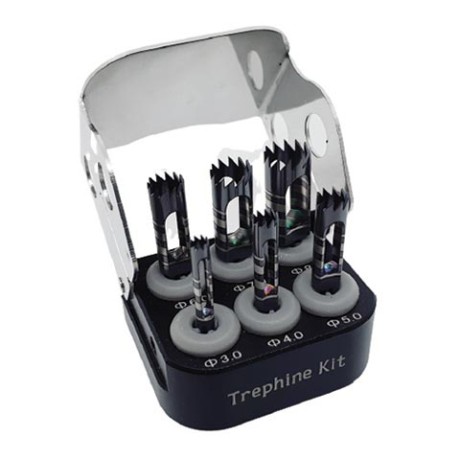
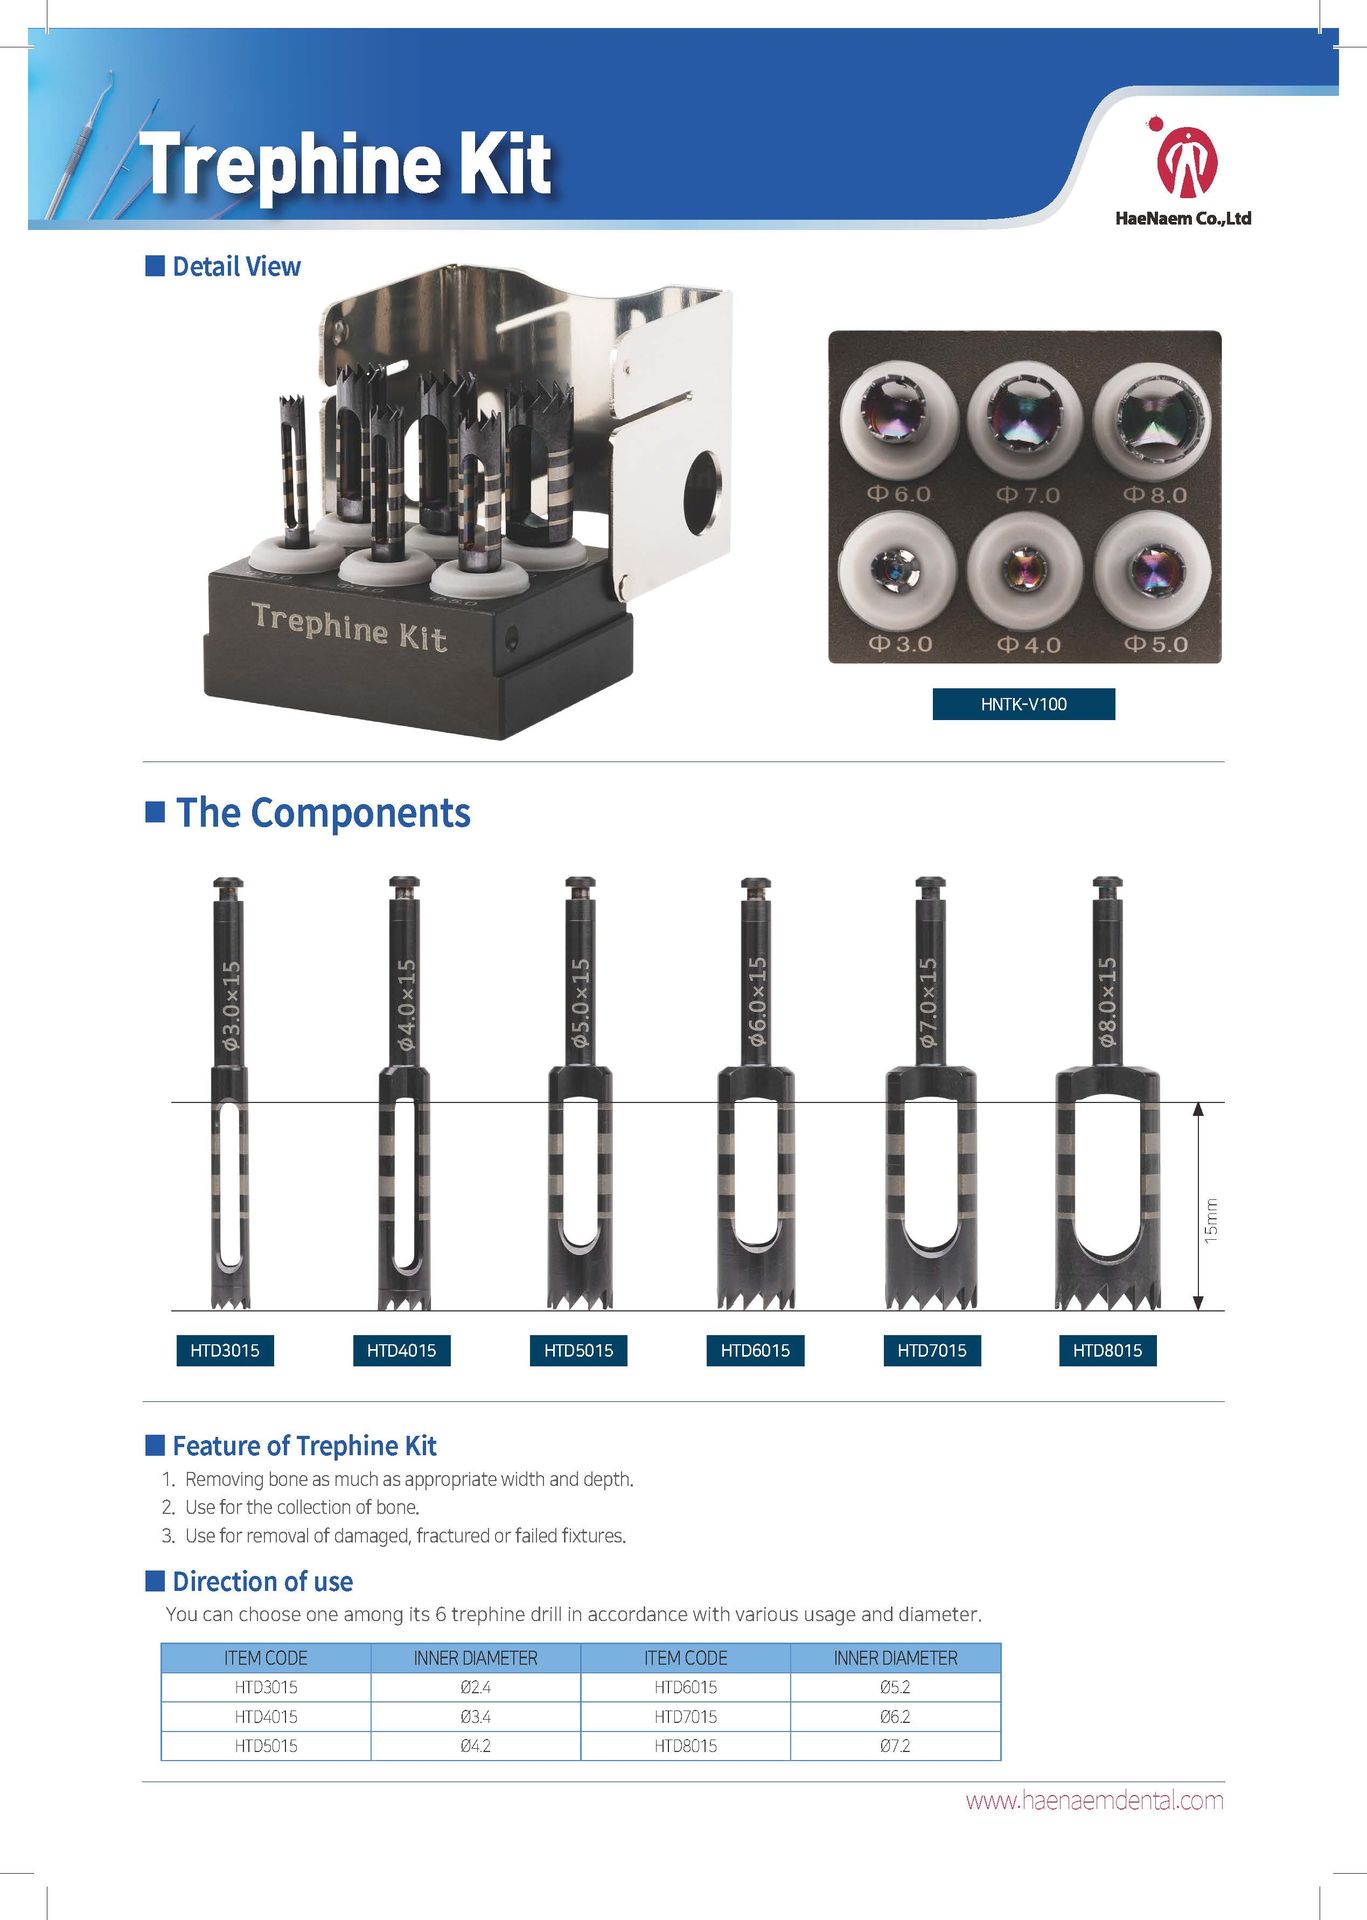
Trephine Kit
A kit that removes bone as mush as appropriate width and depth
It is available for collecting bone
The most important features of this kit are: removing damaged, fractured, or failed fixtures.
The Components of Trephine Kit:
- HTD3015
- HTD4015
- HTD5015
- HTD6015
- HTD7015
- HTD8015
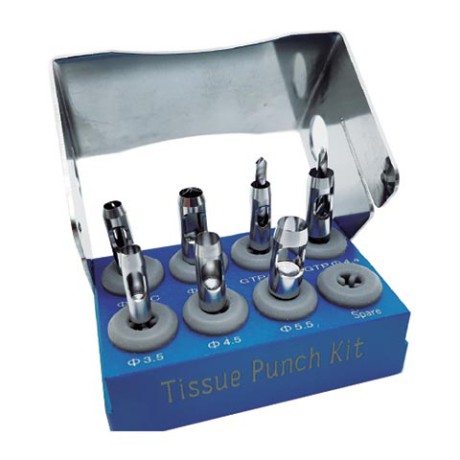
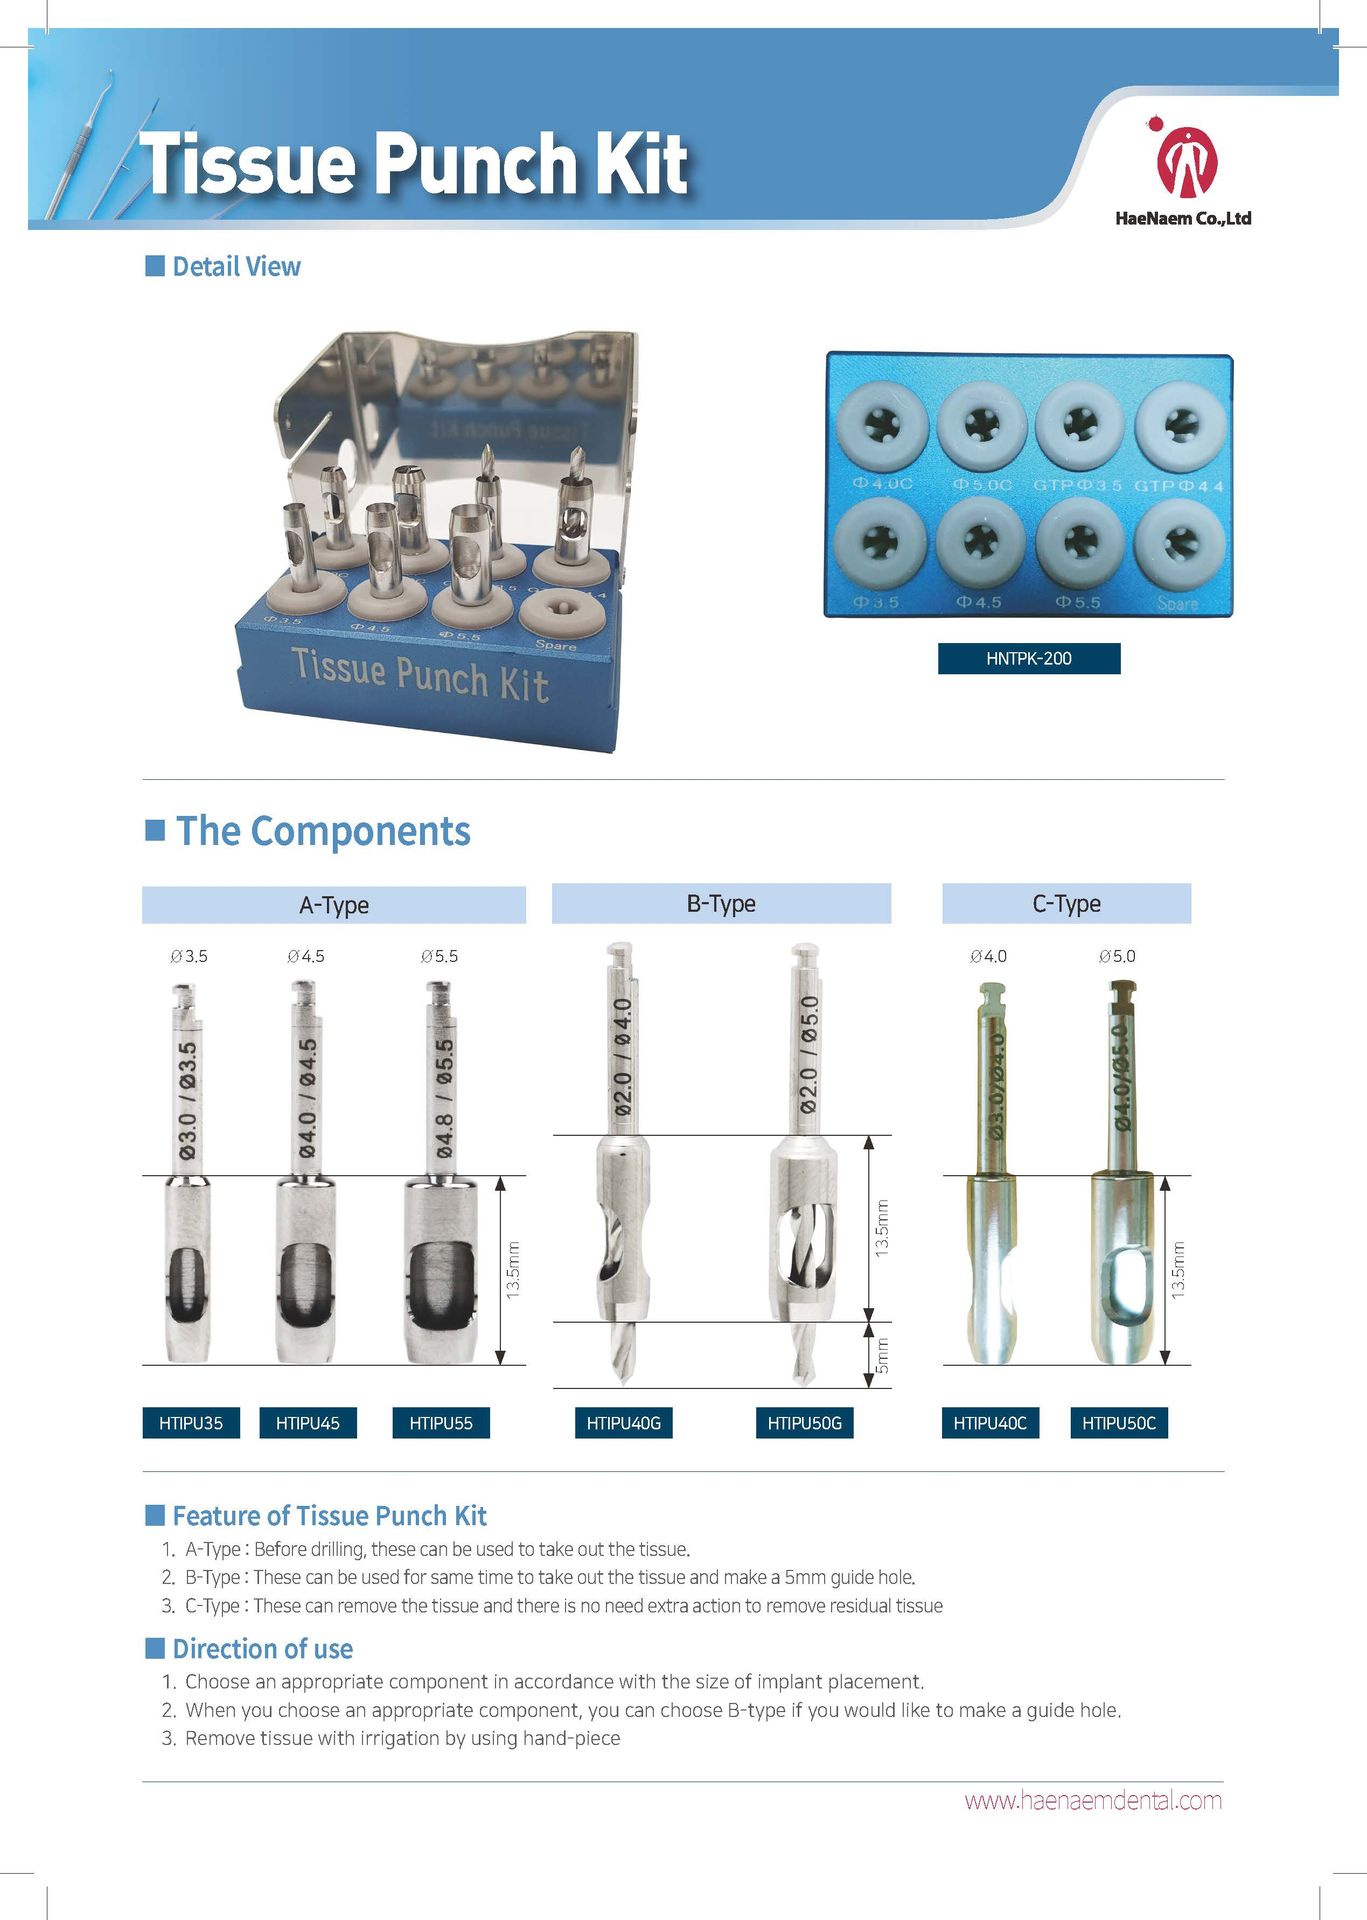
Tissue Punch Kit
With this kit, you can remove tissue with irrigation and by using a hand-piece
This product is another fantastic Punch Kit of HaeNaem
The Components of Tissue Punch Kit:
Type A:
- HTIPU35
- HTIPU40
- HTIPU45
- HTIPU50
- HTIPU55
Type B:
- HTIPU40G
- HTIPU50G
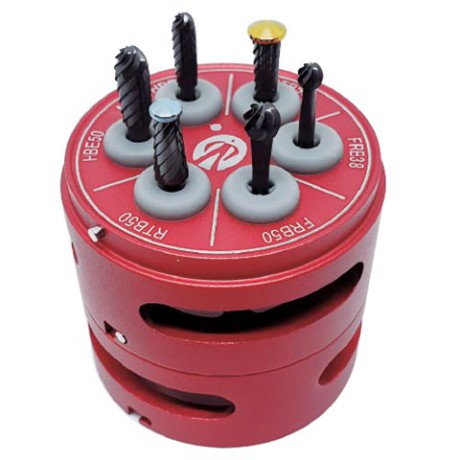
Round Bur Kit
This product has various usage by the shape and the ridge of alveolar bone.
The components of Round Bur Kit:
- FRB38
- FRB50
- HBE38
- HBE50
- RTB50
- BTB50
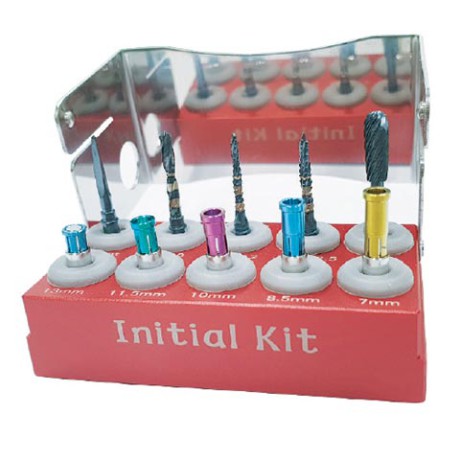
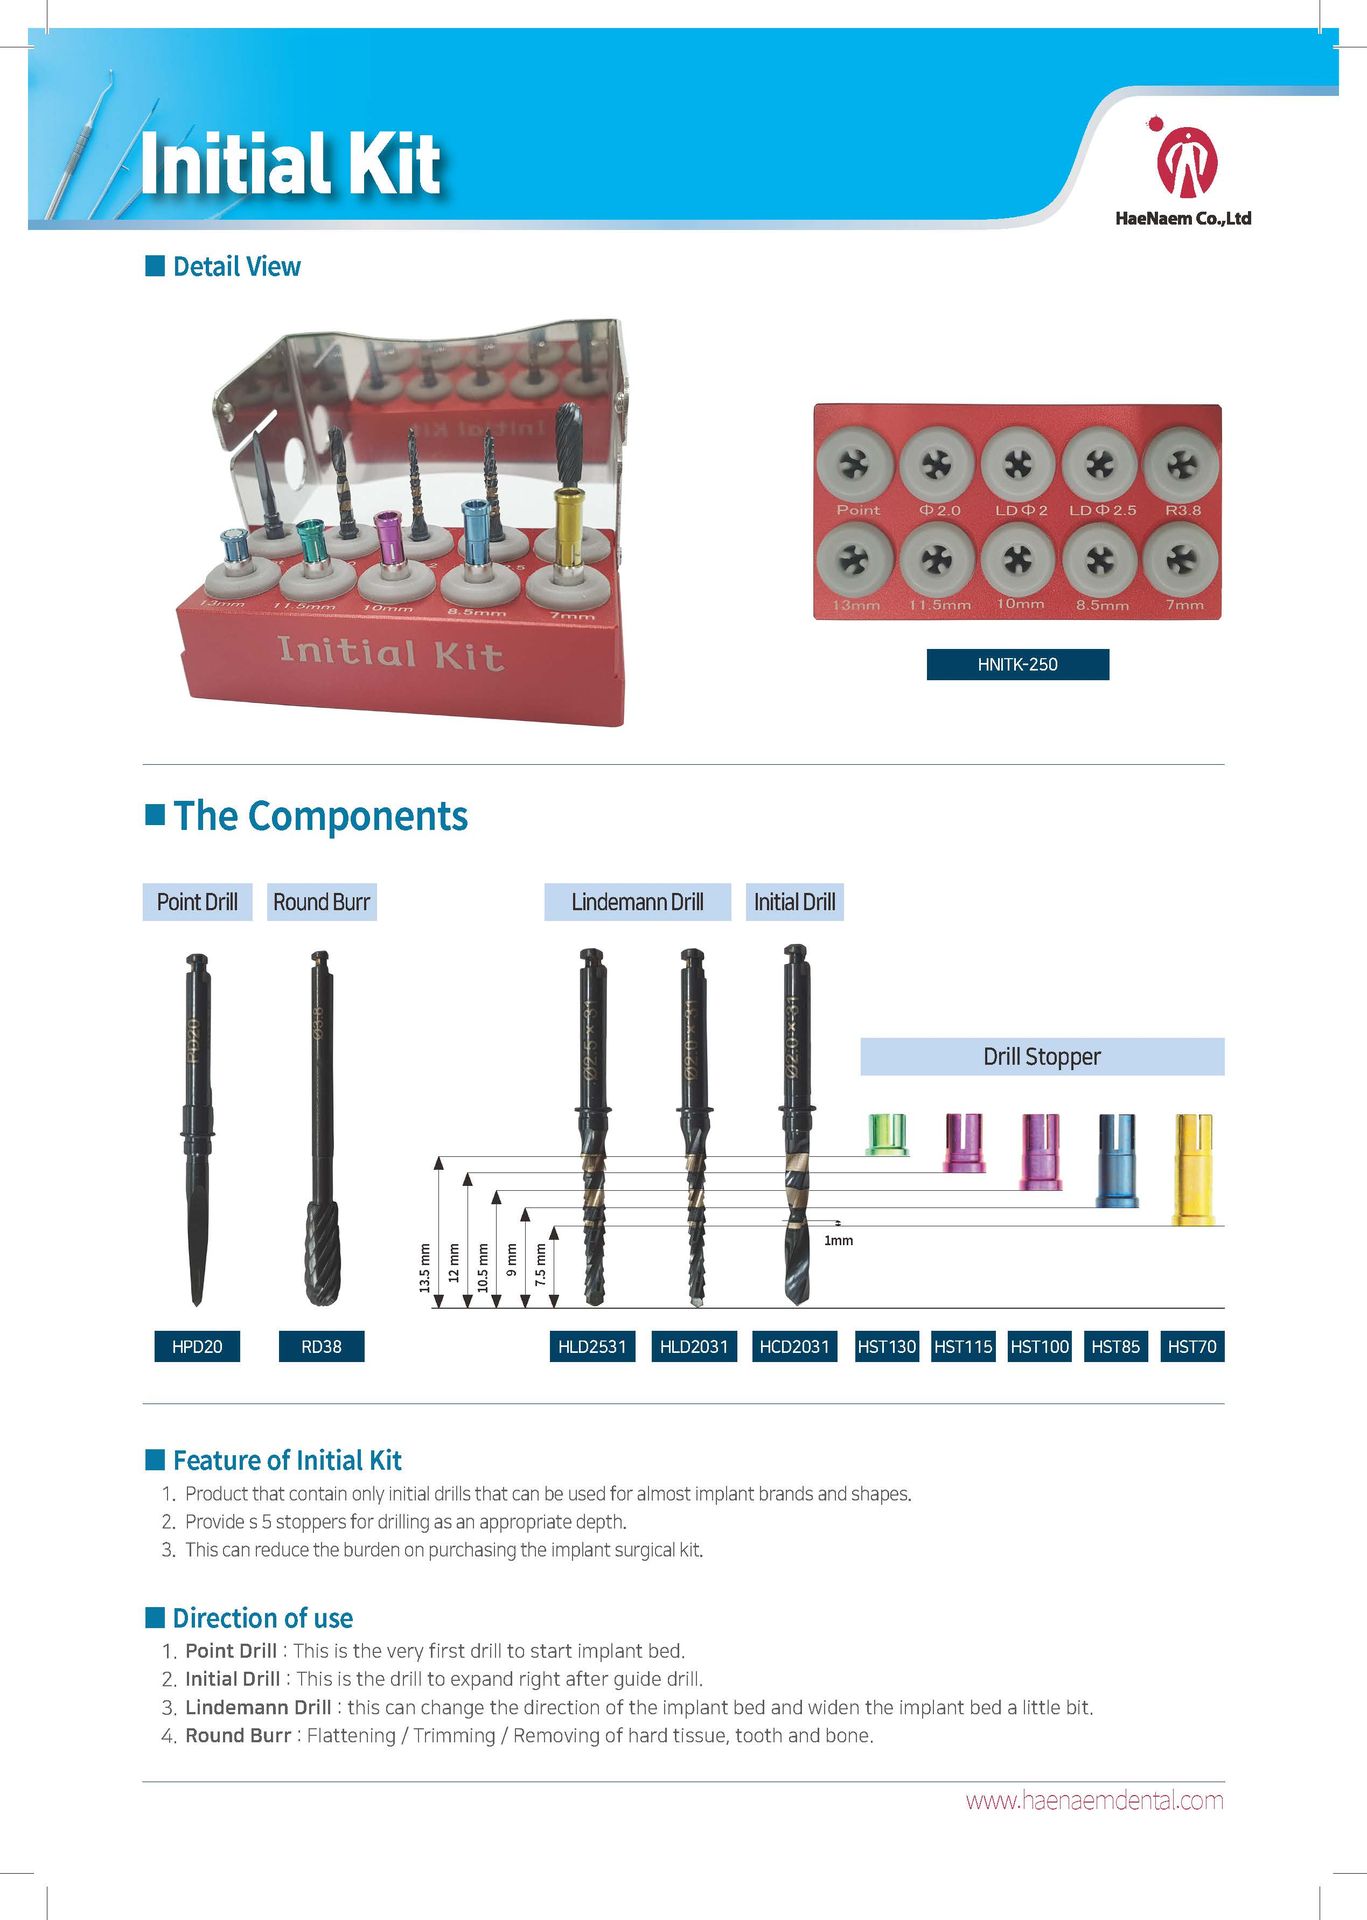
Initial Kit
This product is used for almost all implant brands and shapes.
It can reduce the burden of purchasing the implant surgical kit.
The Components of Initial Kit:
- Round Burr
- Point Drill
- Lindemann Drill
- Initial Drill
- Drill Stopper
 Bone Collector Kit
A kit that prevents bone necrosis
It is designed to fill collecting bone inside of the bone chip maker.
The Components of Bone Collector Kit:
- Bone Chip Maker Drill
- Drill Stopper - 10mm
- Drill Stopper - 5mm
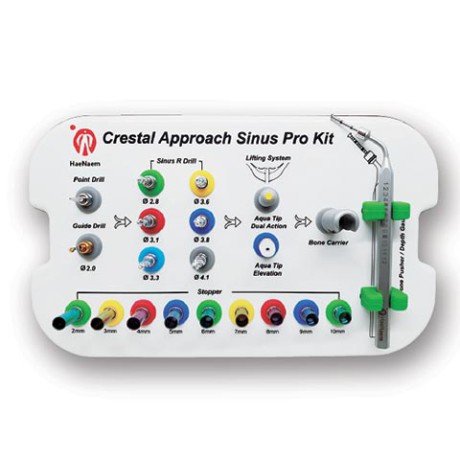
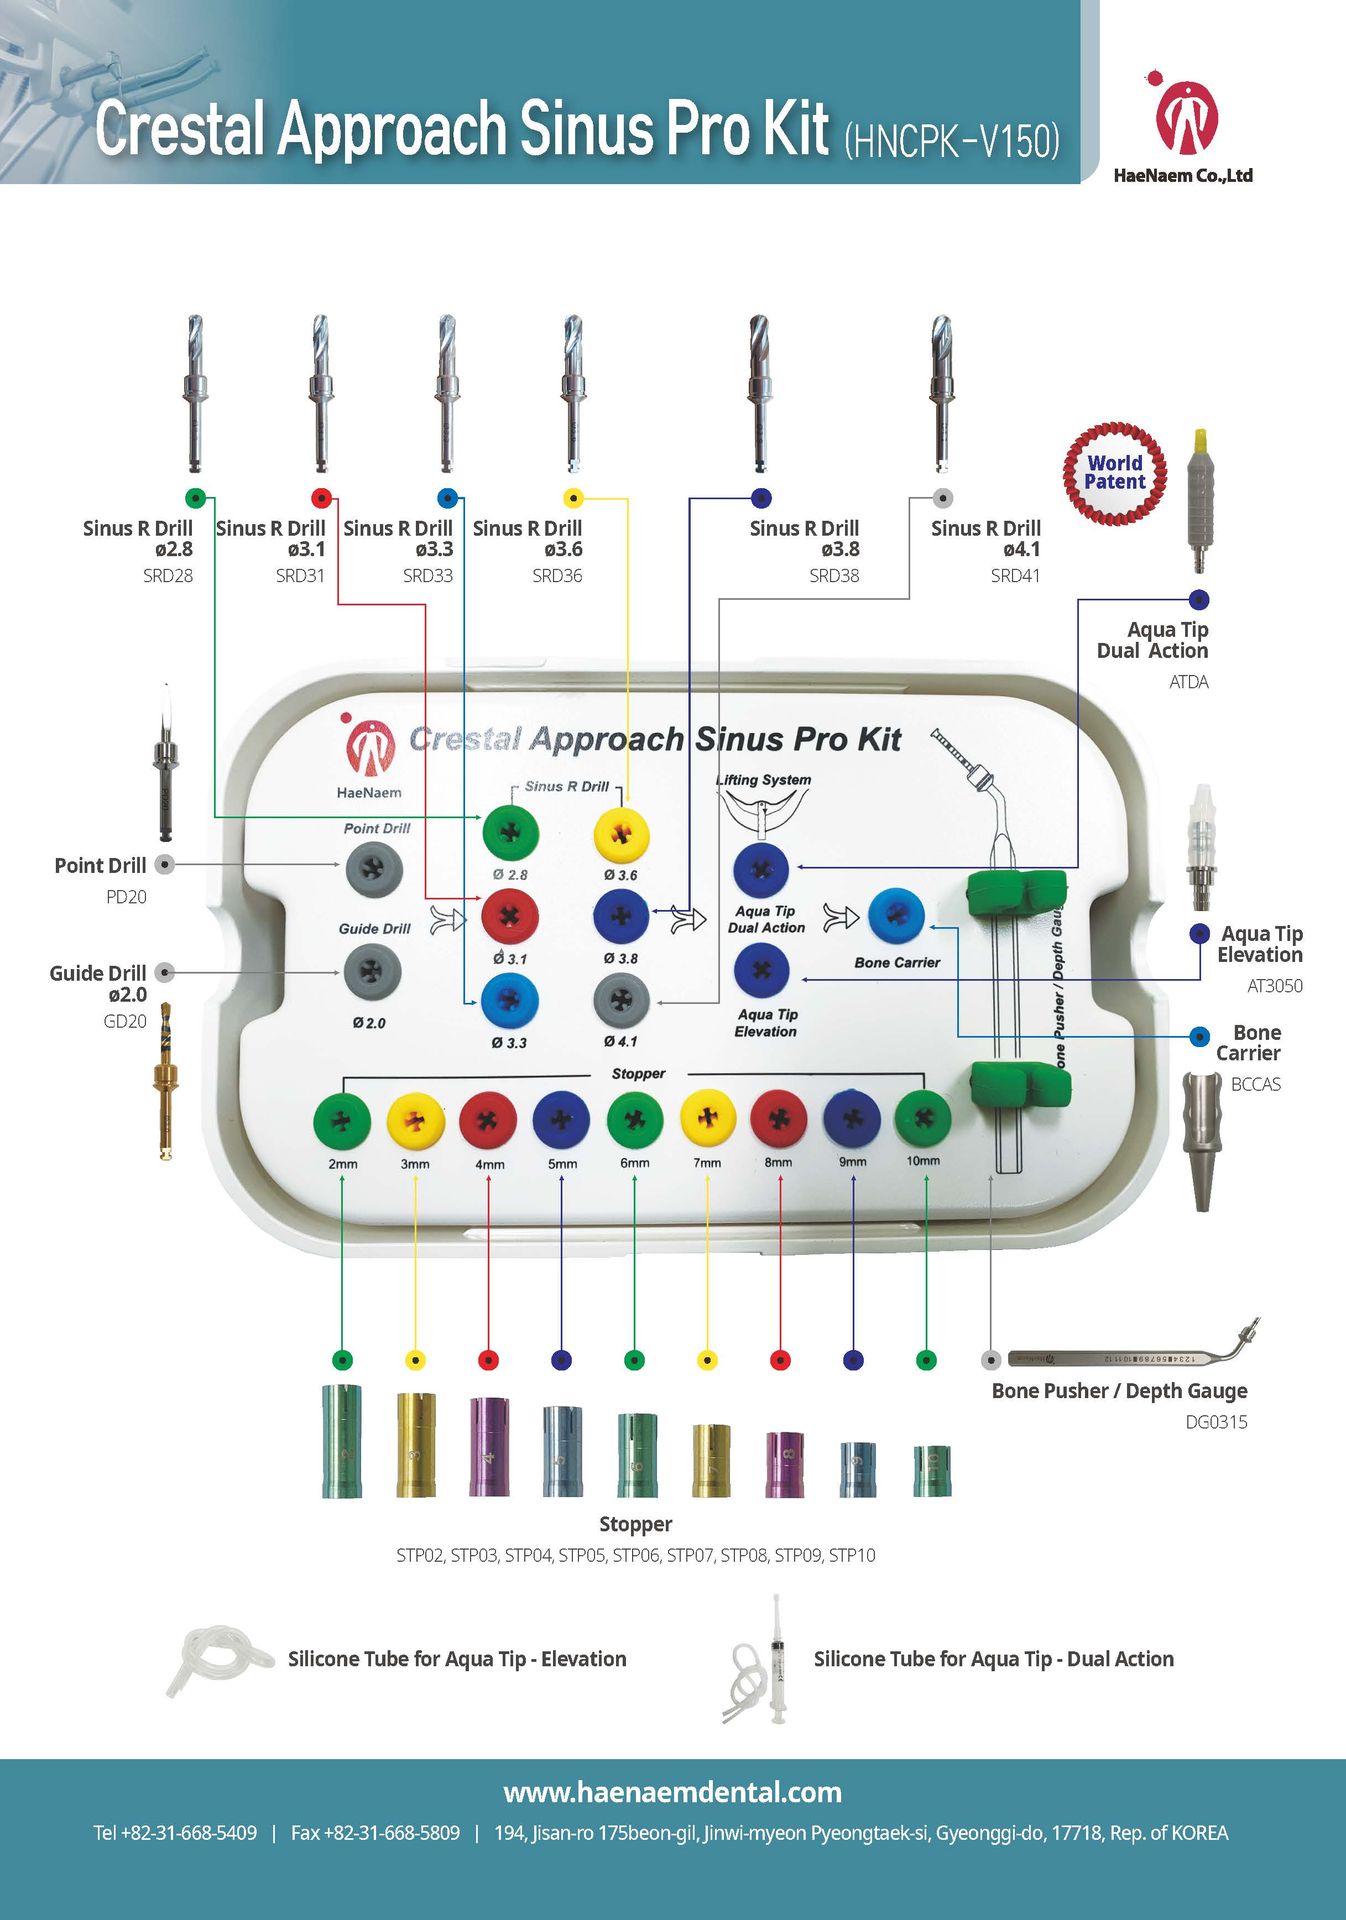
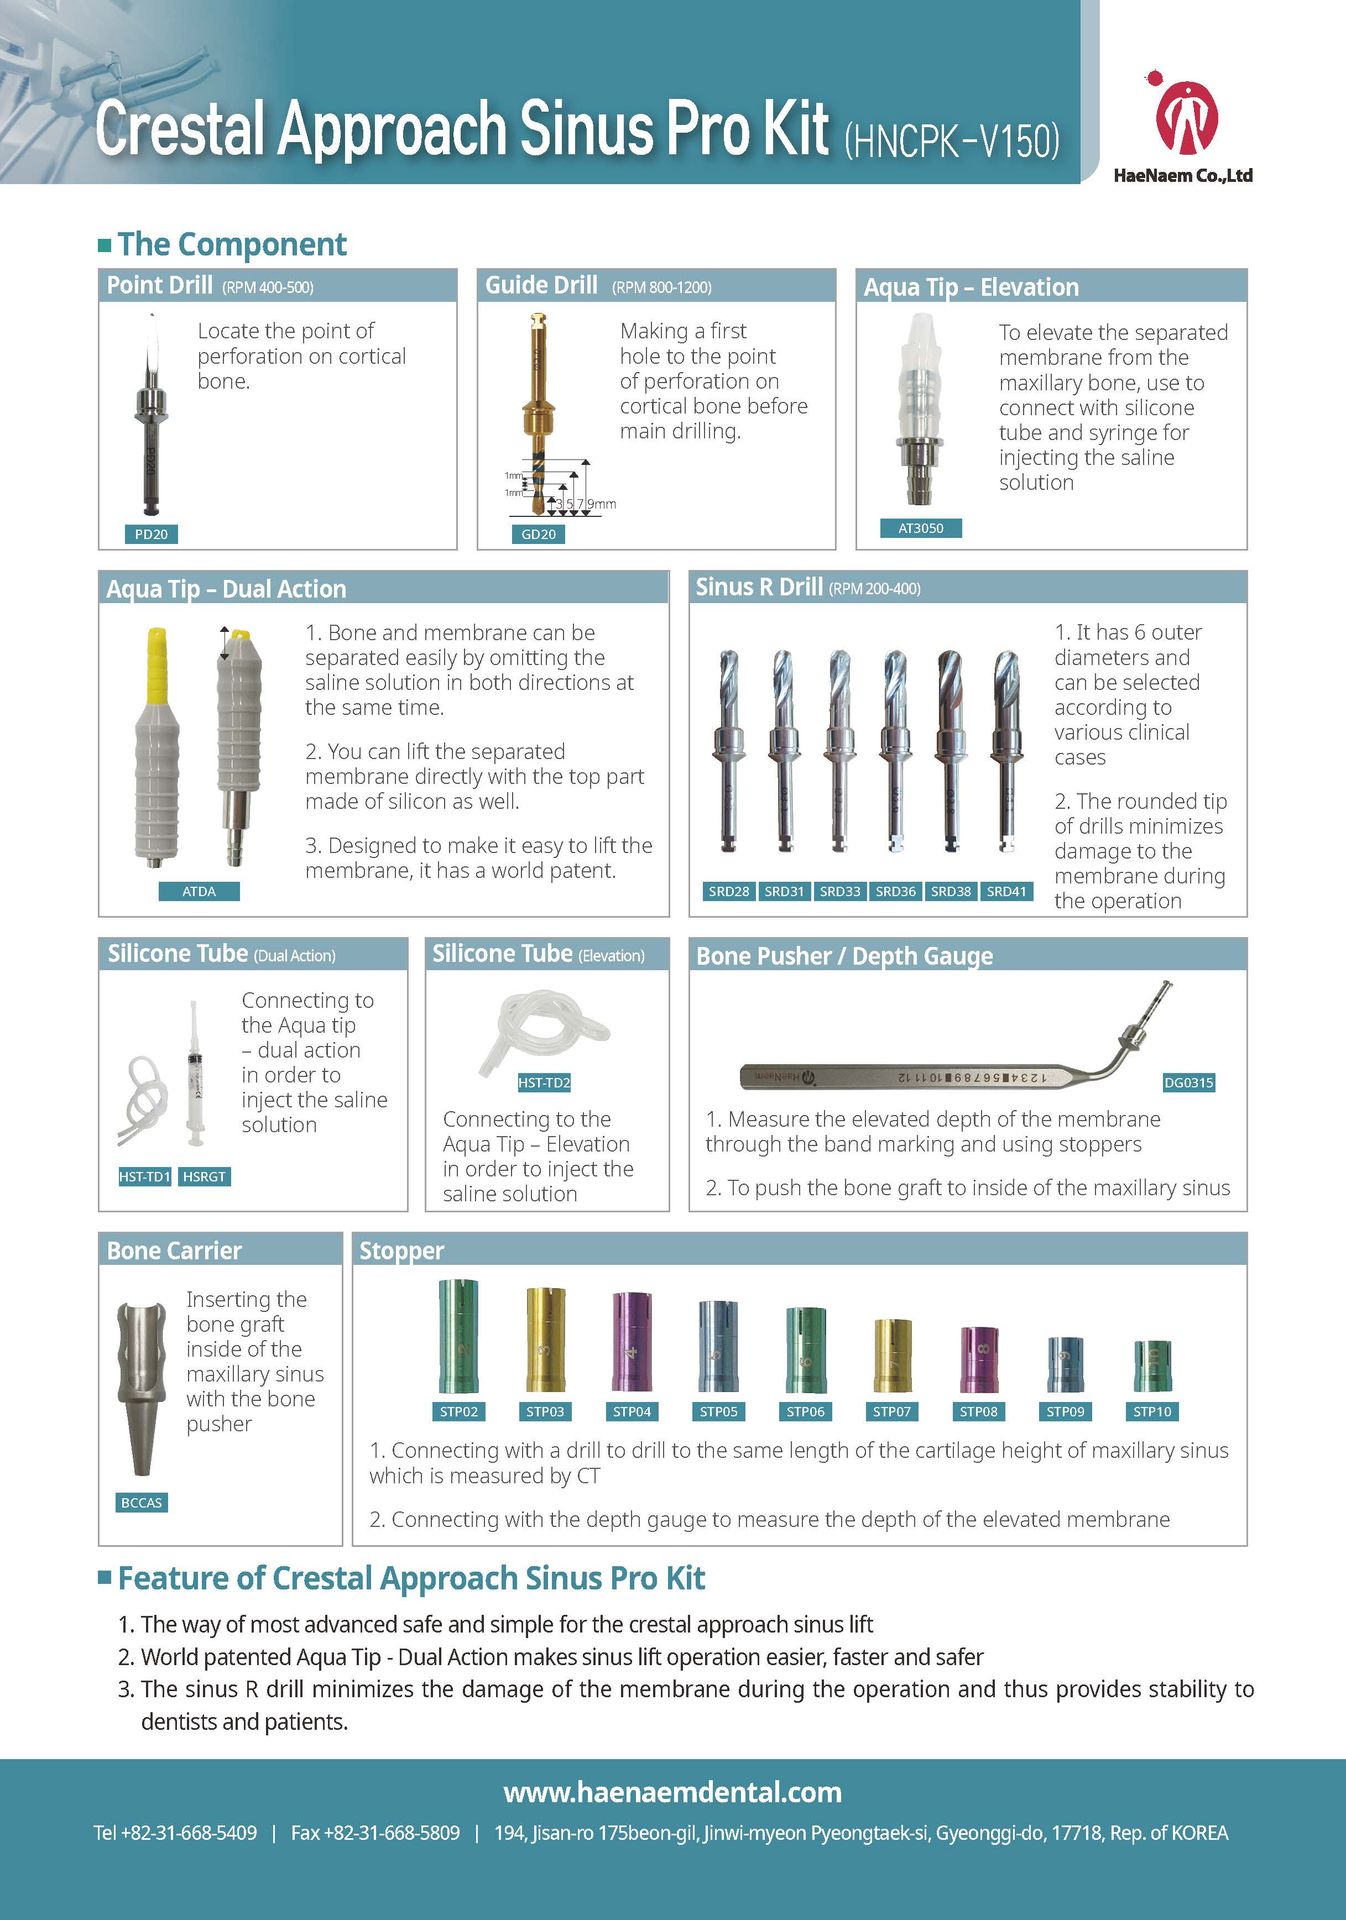
Crestal Approach Sinus Kit
The Component of Crestal Approach Sinus Kit:
- Point Drill
- Guide Drill
- Aqua Tip - Elevation
- Aqua Tip - Dual Action
- Sinus R Drill
- Silicon Tube
- Silicone Tube
- Bone Pusher/ Depth Gauge
- Bone Carrier
- Stopper
This kit will minimize the damages to the membrane during the operation.
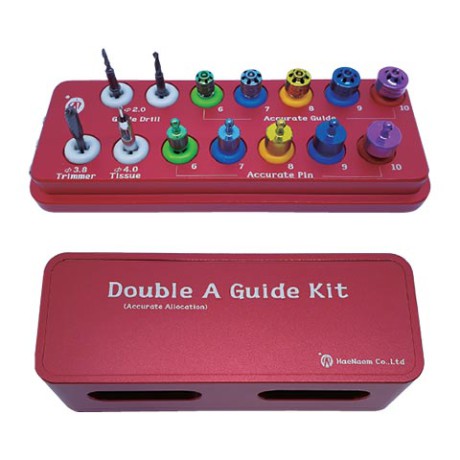
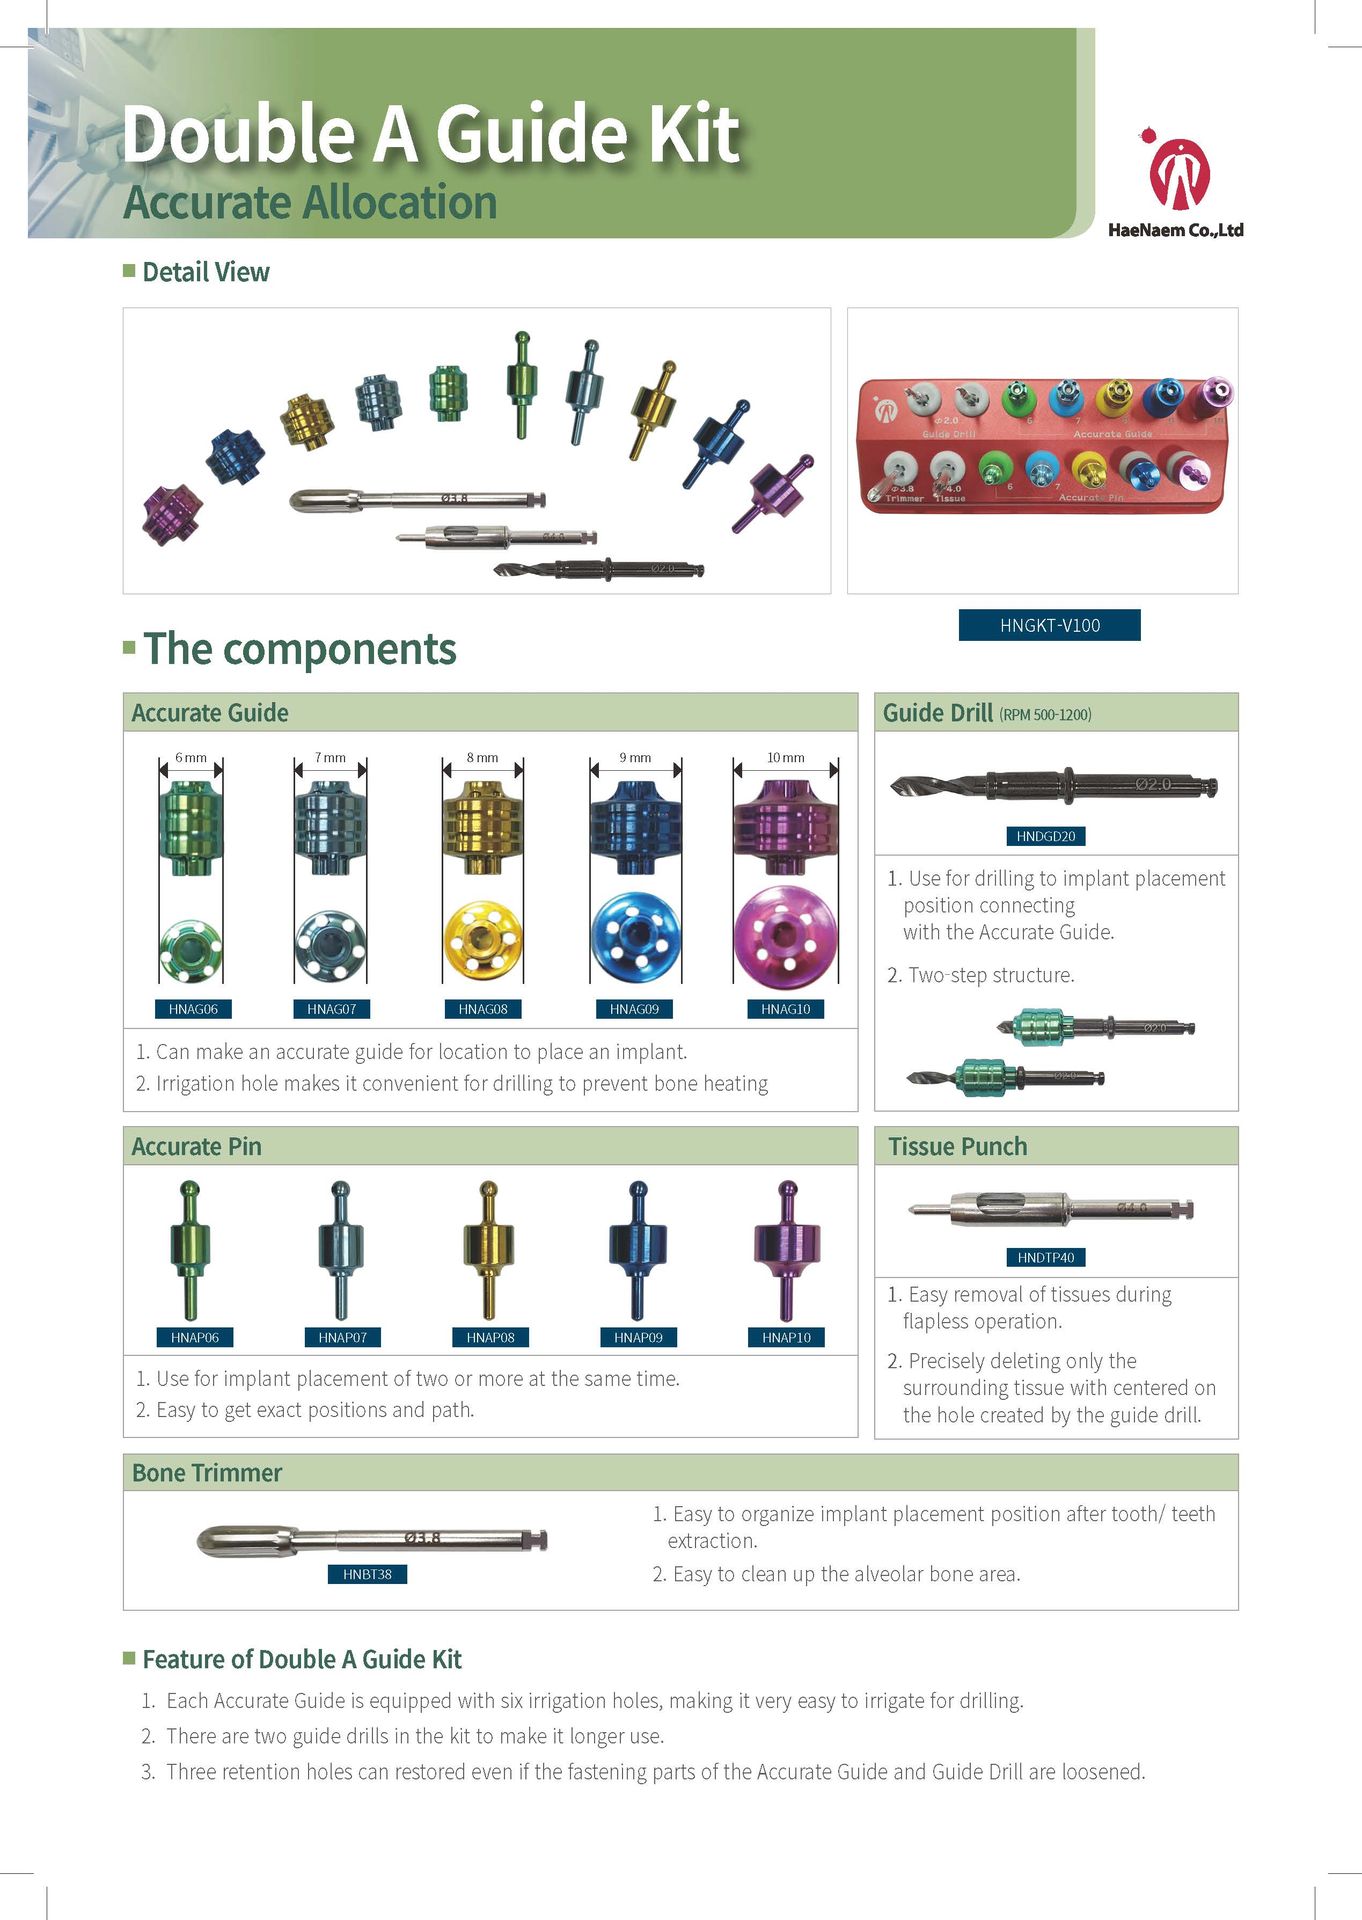
Double A Guide Kit
The Components of Double a Guide Kit:
- Accurate Guide
- Guide Drill
- Accurate Pin
- Tissue Punch
- Boner Trimmer
An easy kit to irrigation for drilling.
Accurate Allocation

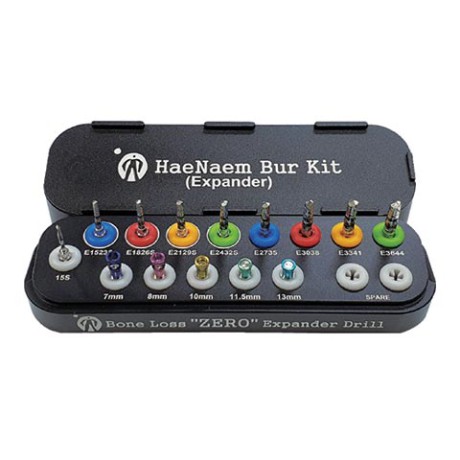
Bur Kit for Expander
Haenaem bur kit for Expander expands and densifies bones at once by drilling.
This kit of Heanaem is available in Hayat Dental
Expander Drill:
- 15S
- E1523S
- E1826S
- E2129S
- E2432S
- E2735
- E3038
- E3341
- E3644
An easy and safe kit for placing an implant in a location that needs expansion of the septum by using a stopper.
Bur Kit for Sinus
- Easy and Safe maxillary sinus autografting
- Early fixture fixation on general implant placement
- Enhance Bone density for poor bone quality through bone condensing
- Pain/ Swelling/ Recovery Period Reduction
- Bur Kit for Sinus is excellent for maintaining path.
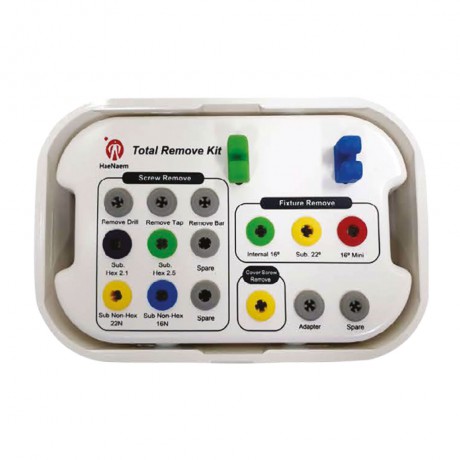
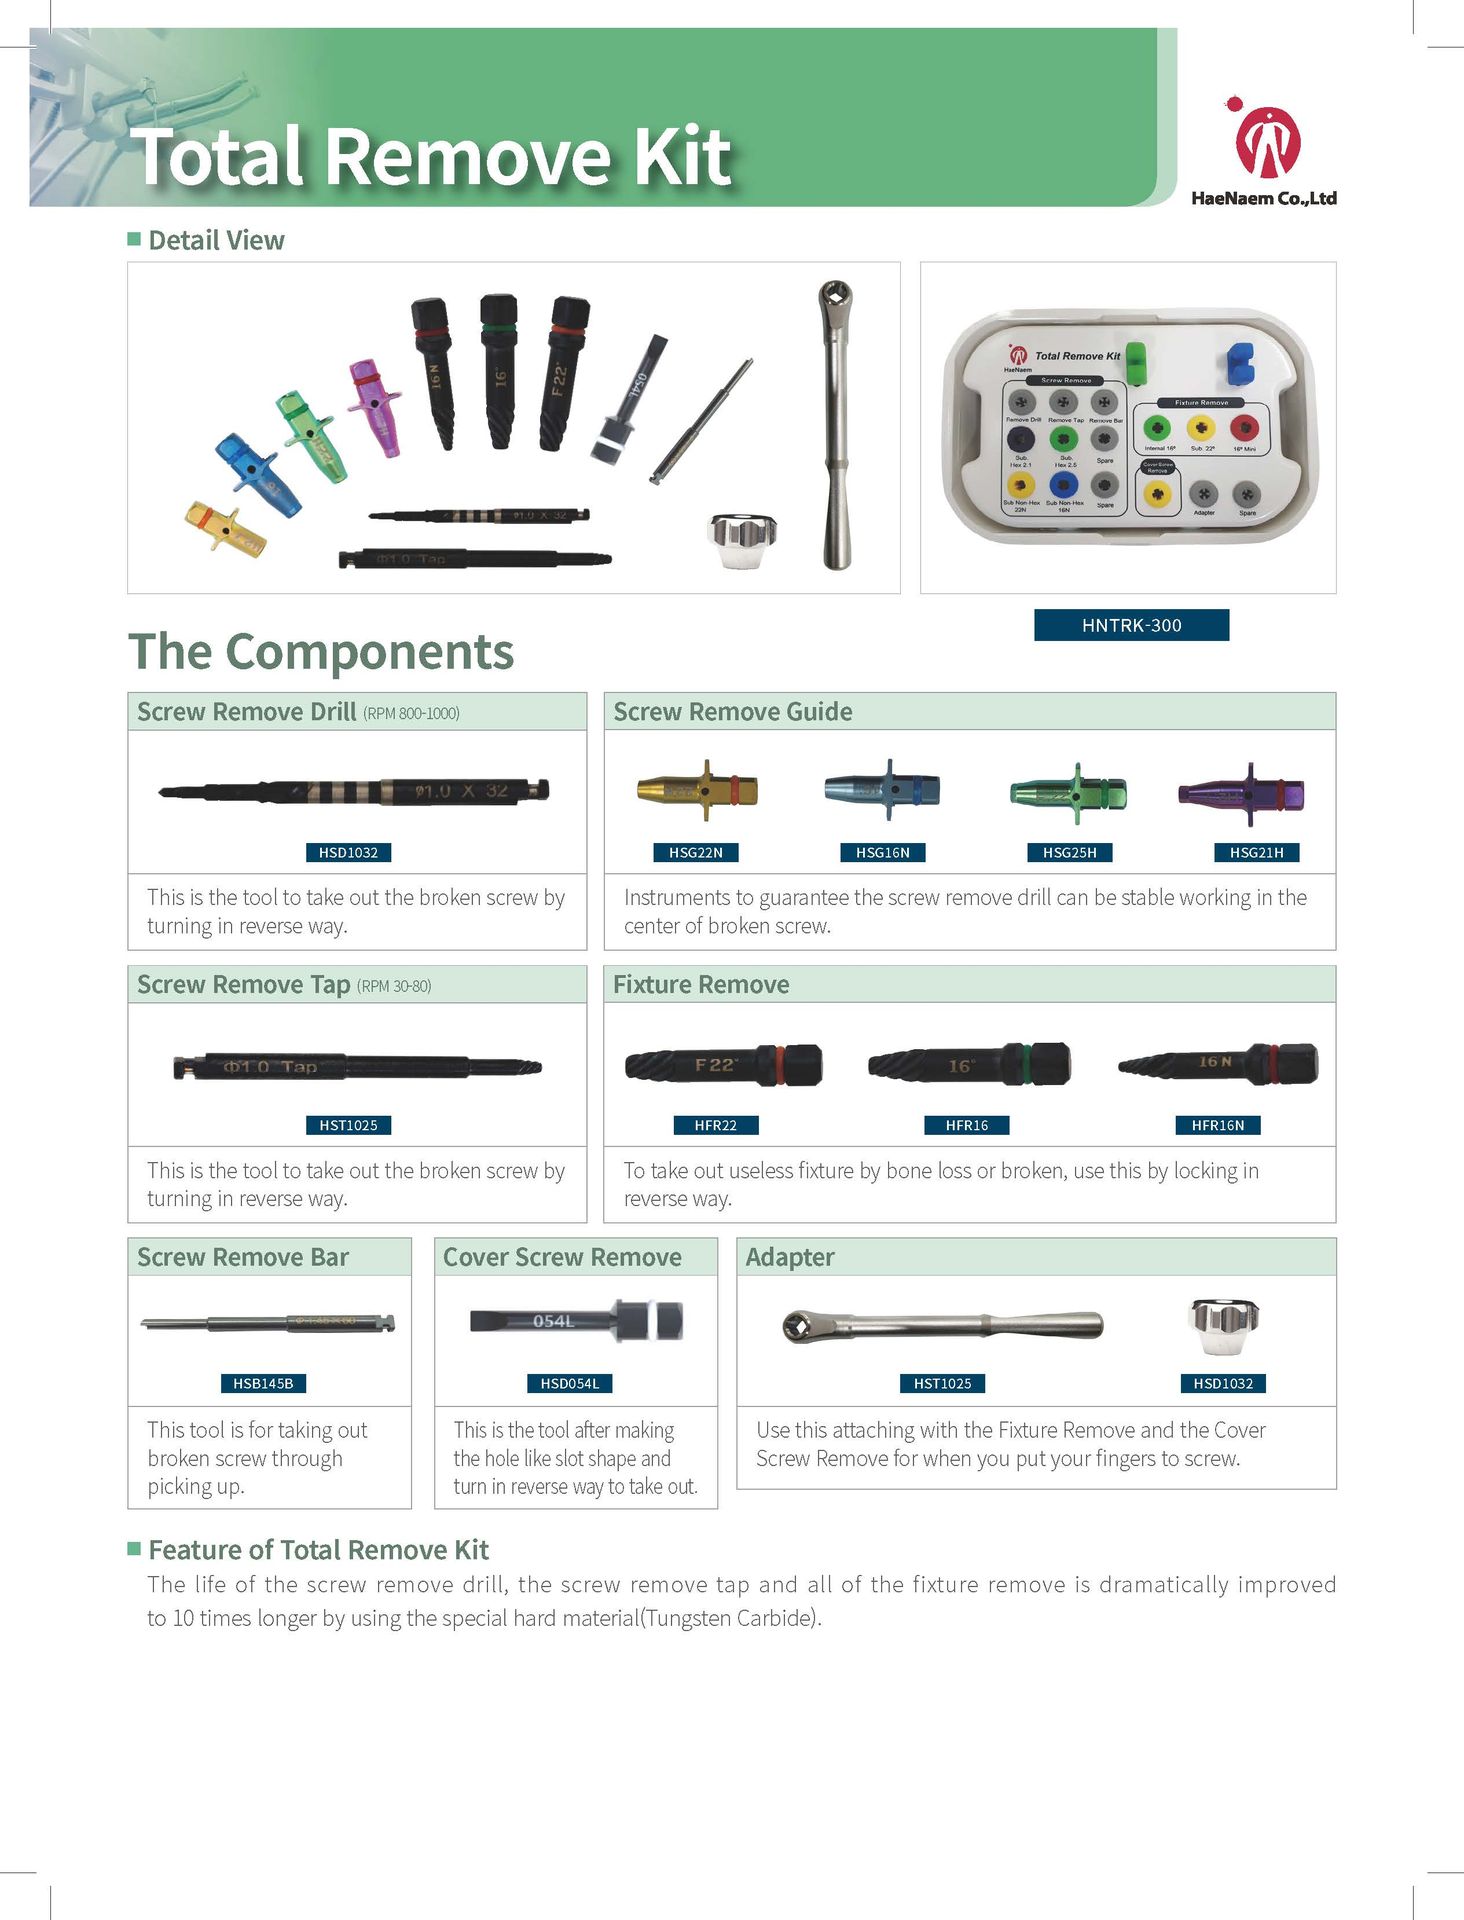
Total Remove Kit
The life of the screw remove drill, the screw remove the tap and all of the fixture removals is dramatically improved to 10 times longer the special hard material (Tungsten Carbide)Detail View
The Components:
- Screw Remove Drill (PRM 800-1000): This is the tool to take out the broken screw by Turning it in a reverse way.
- Screw Remove Guide: Instruments to guarantee the screw remove drill can be stable working in the center of the broken screw.
- Screw Remove Tap (PRM 30-80): This is the tool to take out the broken screw by turning it in a reverse way.
- Fixture Remove: To take out useless fixtures by bone loss or broken, use this by locking in a reverse way.
- Screw Remove Bar: This tool is for t taking out broken screw through picking up.
- Cover Screw Remove: This is the tool after making the hole-like slot shape and tum in a reverse way to take out.
- Adapter: Use this attachment with the Fixture Remove and the Cover Screw Remove for when you put your fingers to screw.
Feature of Total
Remove Kit:
The life of the screw remove drill, the screw removes the tap and all of the fixture removals is dramatically improved to 10 times longer by using the special hard material (Tungsten Carbide).
The direction of Use:
In a case that there is a broken screw in the fixture
- Check the screw inside of the fixture.
- Use the screw remove guide (HEG27H/HIG160/HSG22H/HSG22N) according to the fixture kind.
- Use the screw remove drill (HSD 1032} on the reverse side with high speed.
- Put this screw remove the top (HST1025) and use in reverse side to take the broken screw out slowly.
In a case of a useless cover screw:
- Make a flat driver groove to the cover screw by using a saw cutter.
- Take out the cover screw by using the cover screw remove (HSD054S/HS00542) through counterclockwise rotation.
In a case that there is a useless fixture
- Choose the proper type of fixture to remove drills (HRF22/HRF16/HRF16N) according to the type and size of fixture which is fractured or damaged.
- Insert the fixture remove drill chosen connecting with the adapter (HSH40) into the hole of the fixture and lock each other through counterclockwise movement.
- Attach the ratchet wrench (HRW9785) to the fixture remove the drill and start to screw off very carefully through counter-clockwise rotation.
- Once it starts moving, accordingly take the fixture out by using counter-clockwise rotation


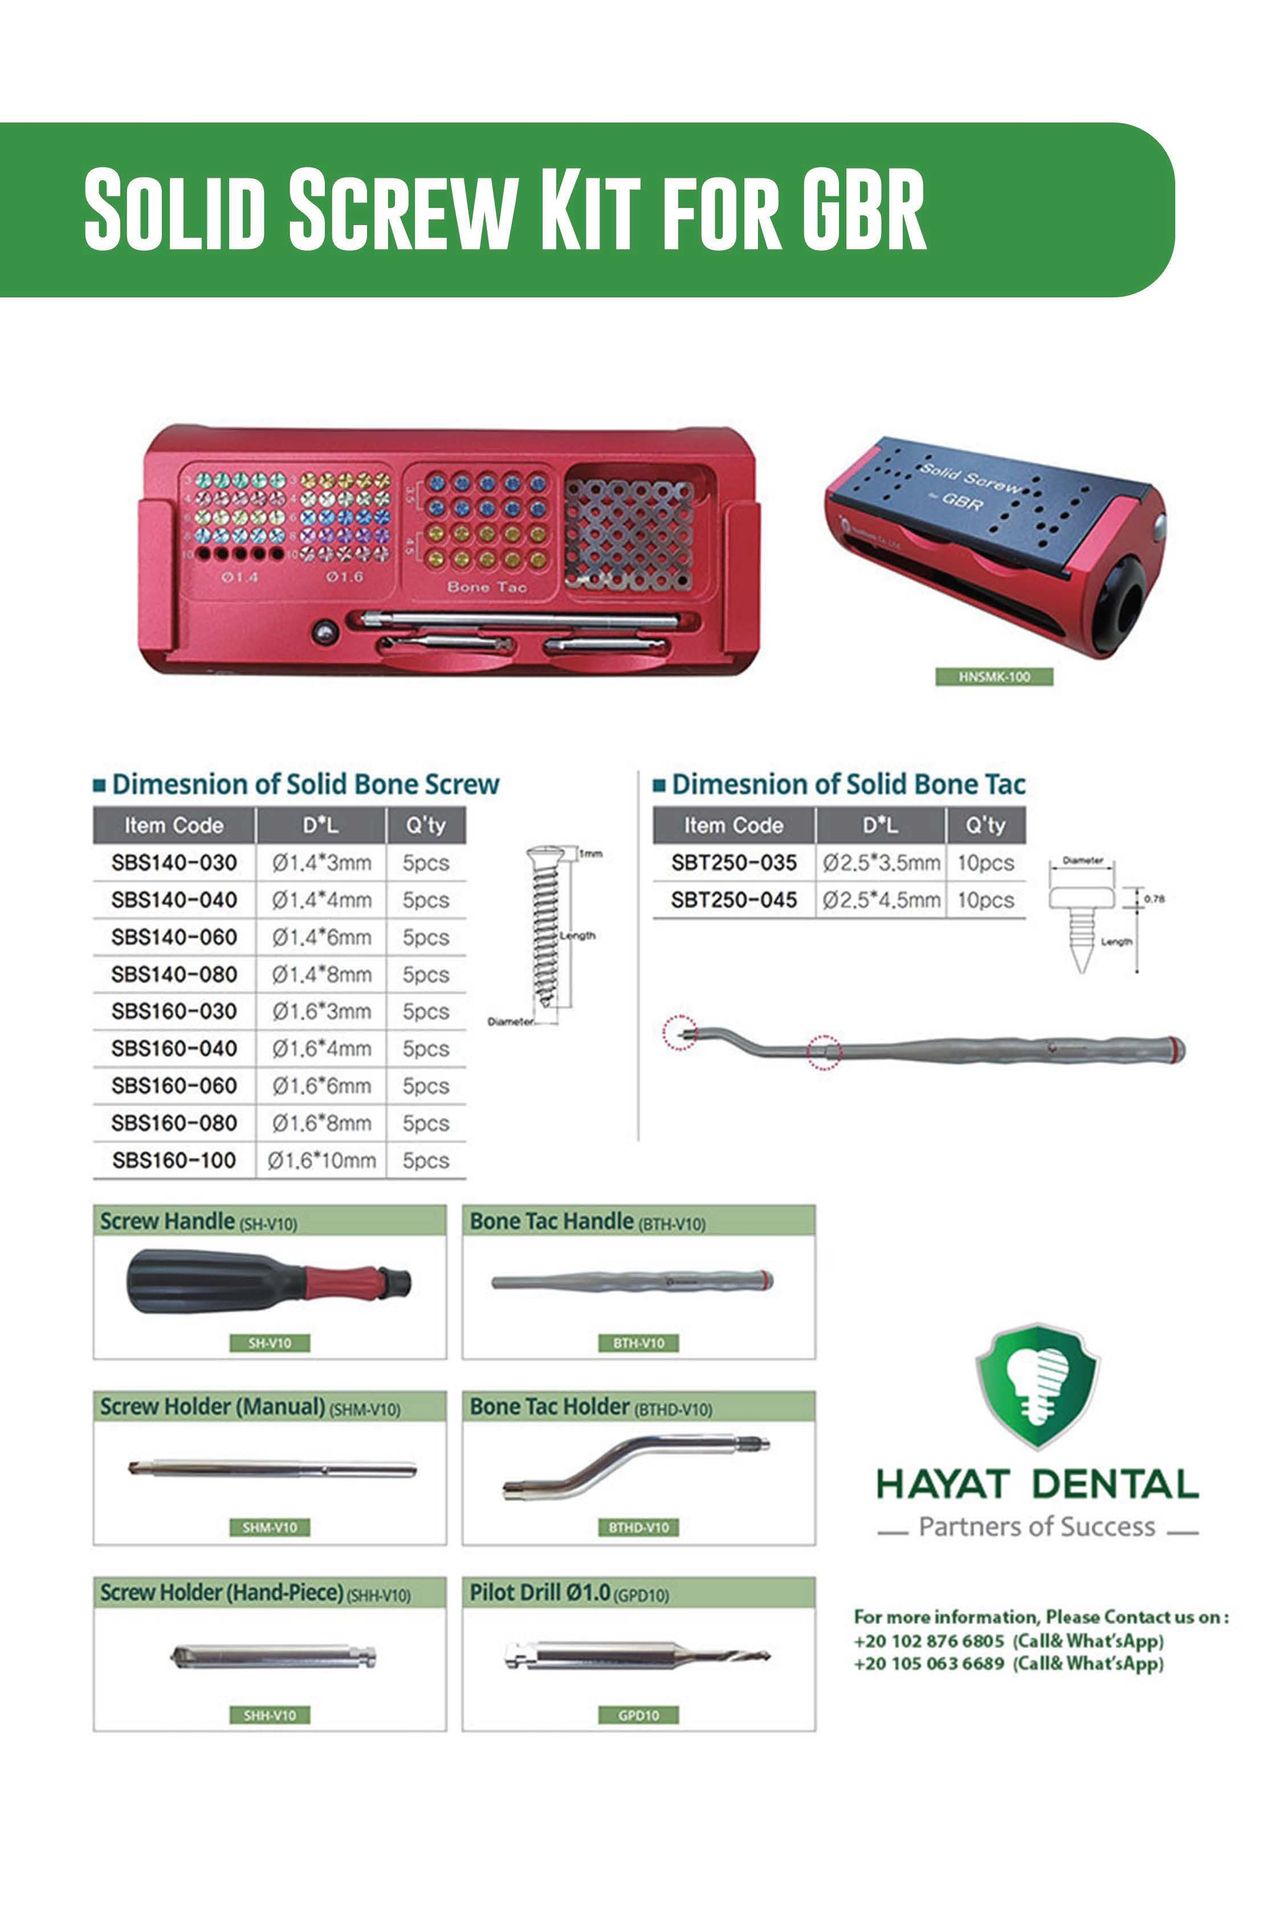
Solid Screw Kit
Solid Screw Kits are an essential part of any lab setup, especially when using optomechanical hardware. They provide a generous assortment of precisely machined screws, washers, and nuts of different sizes within a conveniently organized storage box.
Feature of Neat Tissue Former Kit:
- The recovery period of the patient can be reduced.
- Making easy to put on a crown or prosthesis.
- Provide convenience during the second operation of the implant.
The direction of use:
- Choose an appropriate component in accordance with the size of the healing cap put on.
- Setting the engine to RPM 3080.
- Remove abnormal gingiva and tissue to form surrounding healing abutment.
Feature of Bone Collector Kit:
- The pointed shape of bone chip maker drills specially designed to collect a lot of bone.
- The shape of bone chip maker drills and the stoppers minimized bone loss.
- In the beginning, strongly recommends that you use 5mm stoppers.
- Designed to fill collecting bone inside of the boneellIpmaerby drilling once.
- Short drilling Can prevent bone necrosis
Direction of use
- Choose appropriate bone chip maker drill and stopper in accordance with the size of the bone collecting area.
- Attach the first part of the 5mm stopper to the bone chip maker drill.
- Start drilling with 1cc of irrigation (Recommended SOORPM).
- Make sure the status of bone collecting with the stopper fully attached.
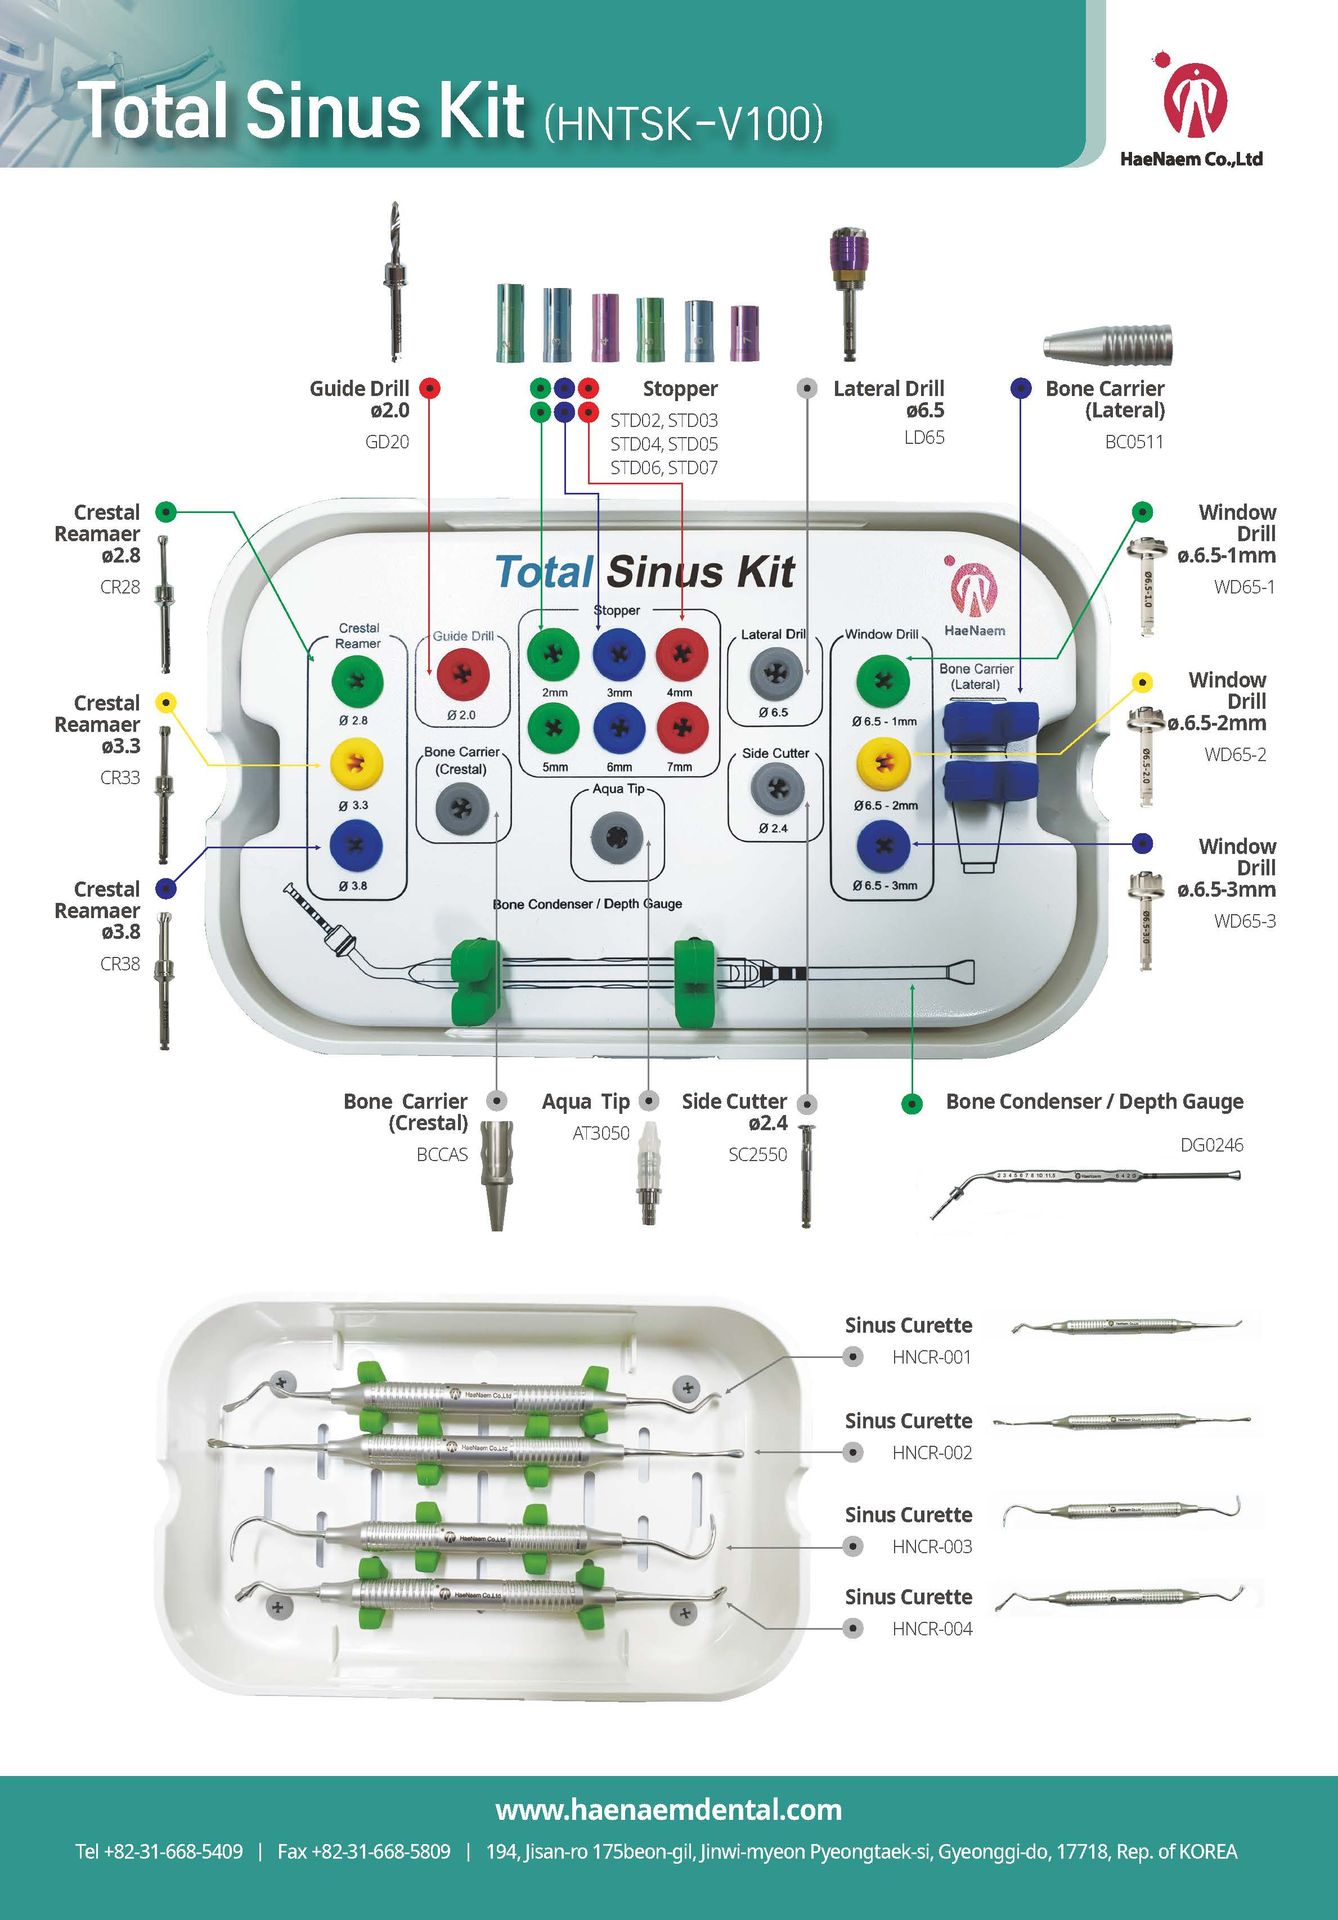
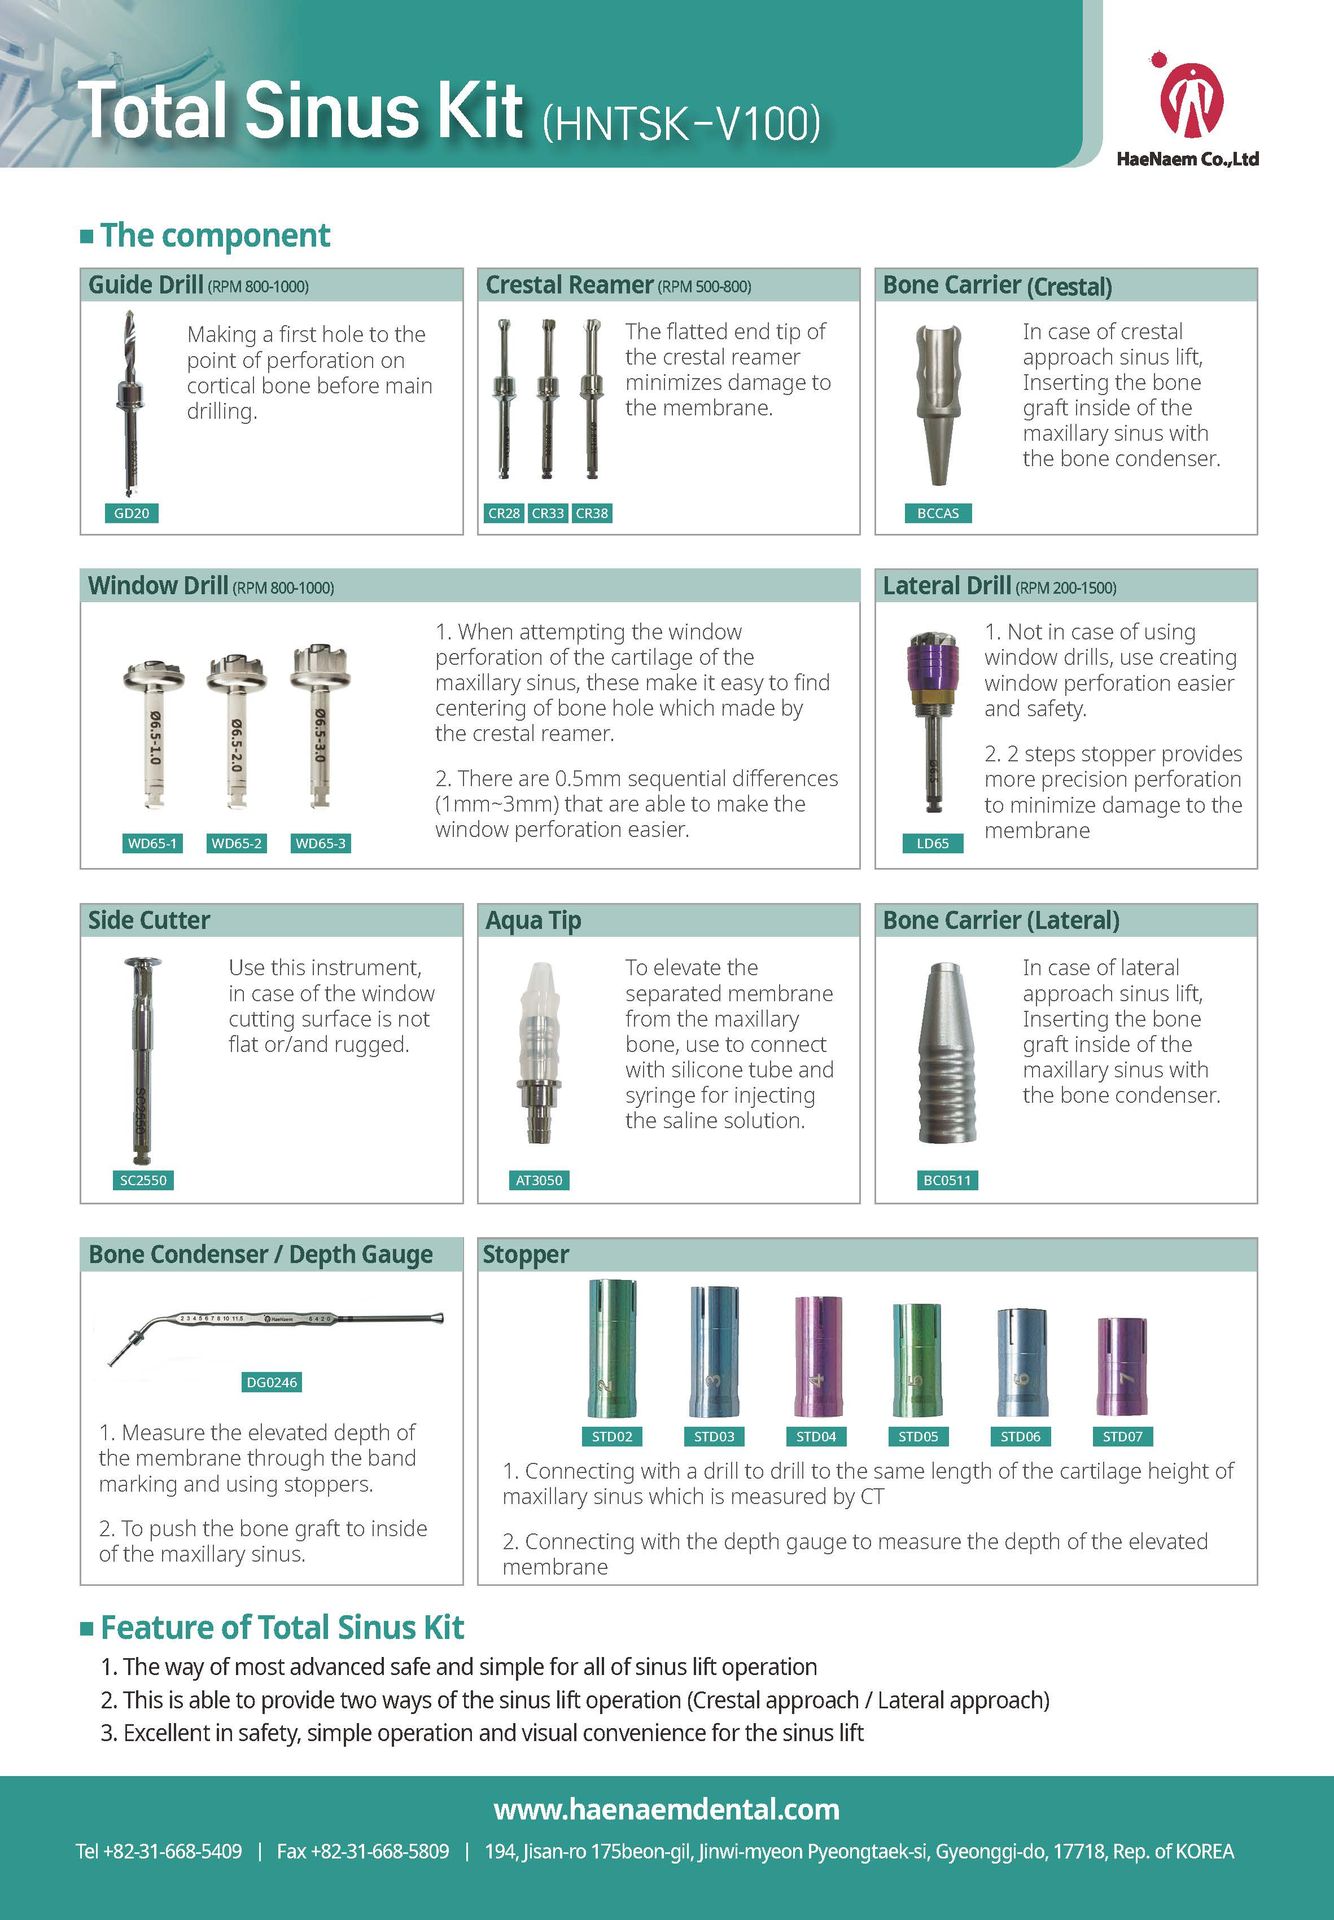
The Sinus Lifts Surgical Kit
The sinus lifts surgical kit is a lightweight, well-balanced set of surgical instruments for sinus lift procedures. If back teeth are to get replaced after having been missing for a long time, the sinus cavity encompasses a tendency to become pneumatized or "bubble down. Implants won't find adequate bony support they have from the sinus floor. For successful implantation, considerably more bone is required. For making up this missing bone there's a typical procedure which will be done to make additional bone height and lead to an adequate receptive site to put a tooth implant and return the choice of getting attached permanent teeth again. Sinus lifting procedures as of today supporting different techniques, suiting the clinician's favorite/needed approach (Crestal or Lateral) and guaranteeing simple and intuitive surgical systems with maximal safety.
The Component:
- Guide Drill (RPM 800-1000): Making the first hole to the point of perforation on the cortical bone before the main drilling
- CrestaI Reamer (RPM 500-800): The Flatted end tip of the crestal reamer minimizes damage to the membrane.
- Bone Carrier (Crestal): In the case of crestal approach sinus lift, inserting the bone graft inside of the maxillary sinus with the bone condenser.
- Window Drill (RPM 800-1000): 1. When attempting the window perforation of the cartilage of the maxillary sinus, these make it easy to find centering of a bone hole made by the crestal reamer.
- There are 0.5mm sequential differences (1 mm-3mm) that are able to make the window perforation easier.
- Lateral Drill (RPM 200-1500): 1. Not in the case of using window drills, use creating window perforation easier and safer.
- 2 steps stopper provides more precision perforation to minimize damage to the membrane.
- Side Cutter: Use this instrument, in case of the window cutting surface, is not flat or/and rugged.
- Aqua Tip: To elevate the separated membrane from the maxillary bone, use to connect with silicone tube and syringe for injecting the saline solution.
- Bone Carrier (Lateral): In the case of the lateral approach sinus lift, inserting the bone graft inside of the maxillary sinus with the bone condenser.
- Bone Condenser/Depth Gauge: 1. Measure the elevated depth of the membrane through the band marking and using stoppers.
- To push the bone graft to the inside of the maxillary sinus.
- Stopper: 1. Connecting with a drill to drill to the same length of the cartilage height of maxillary sinus which is measured by CT
- Connecting with the depth gauge to measure the depth of the elevated membrane
Feature of Total Sinus Kit:
- -The most advanced, safe and simple way for all sinus lift techniques
- Open and closed techniques
- Excellent in safety, simple operation, and visual convenience
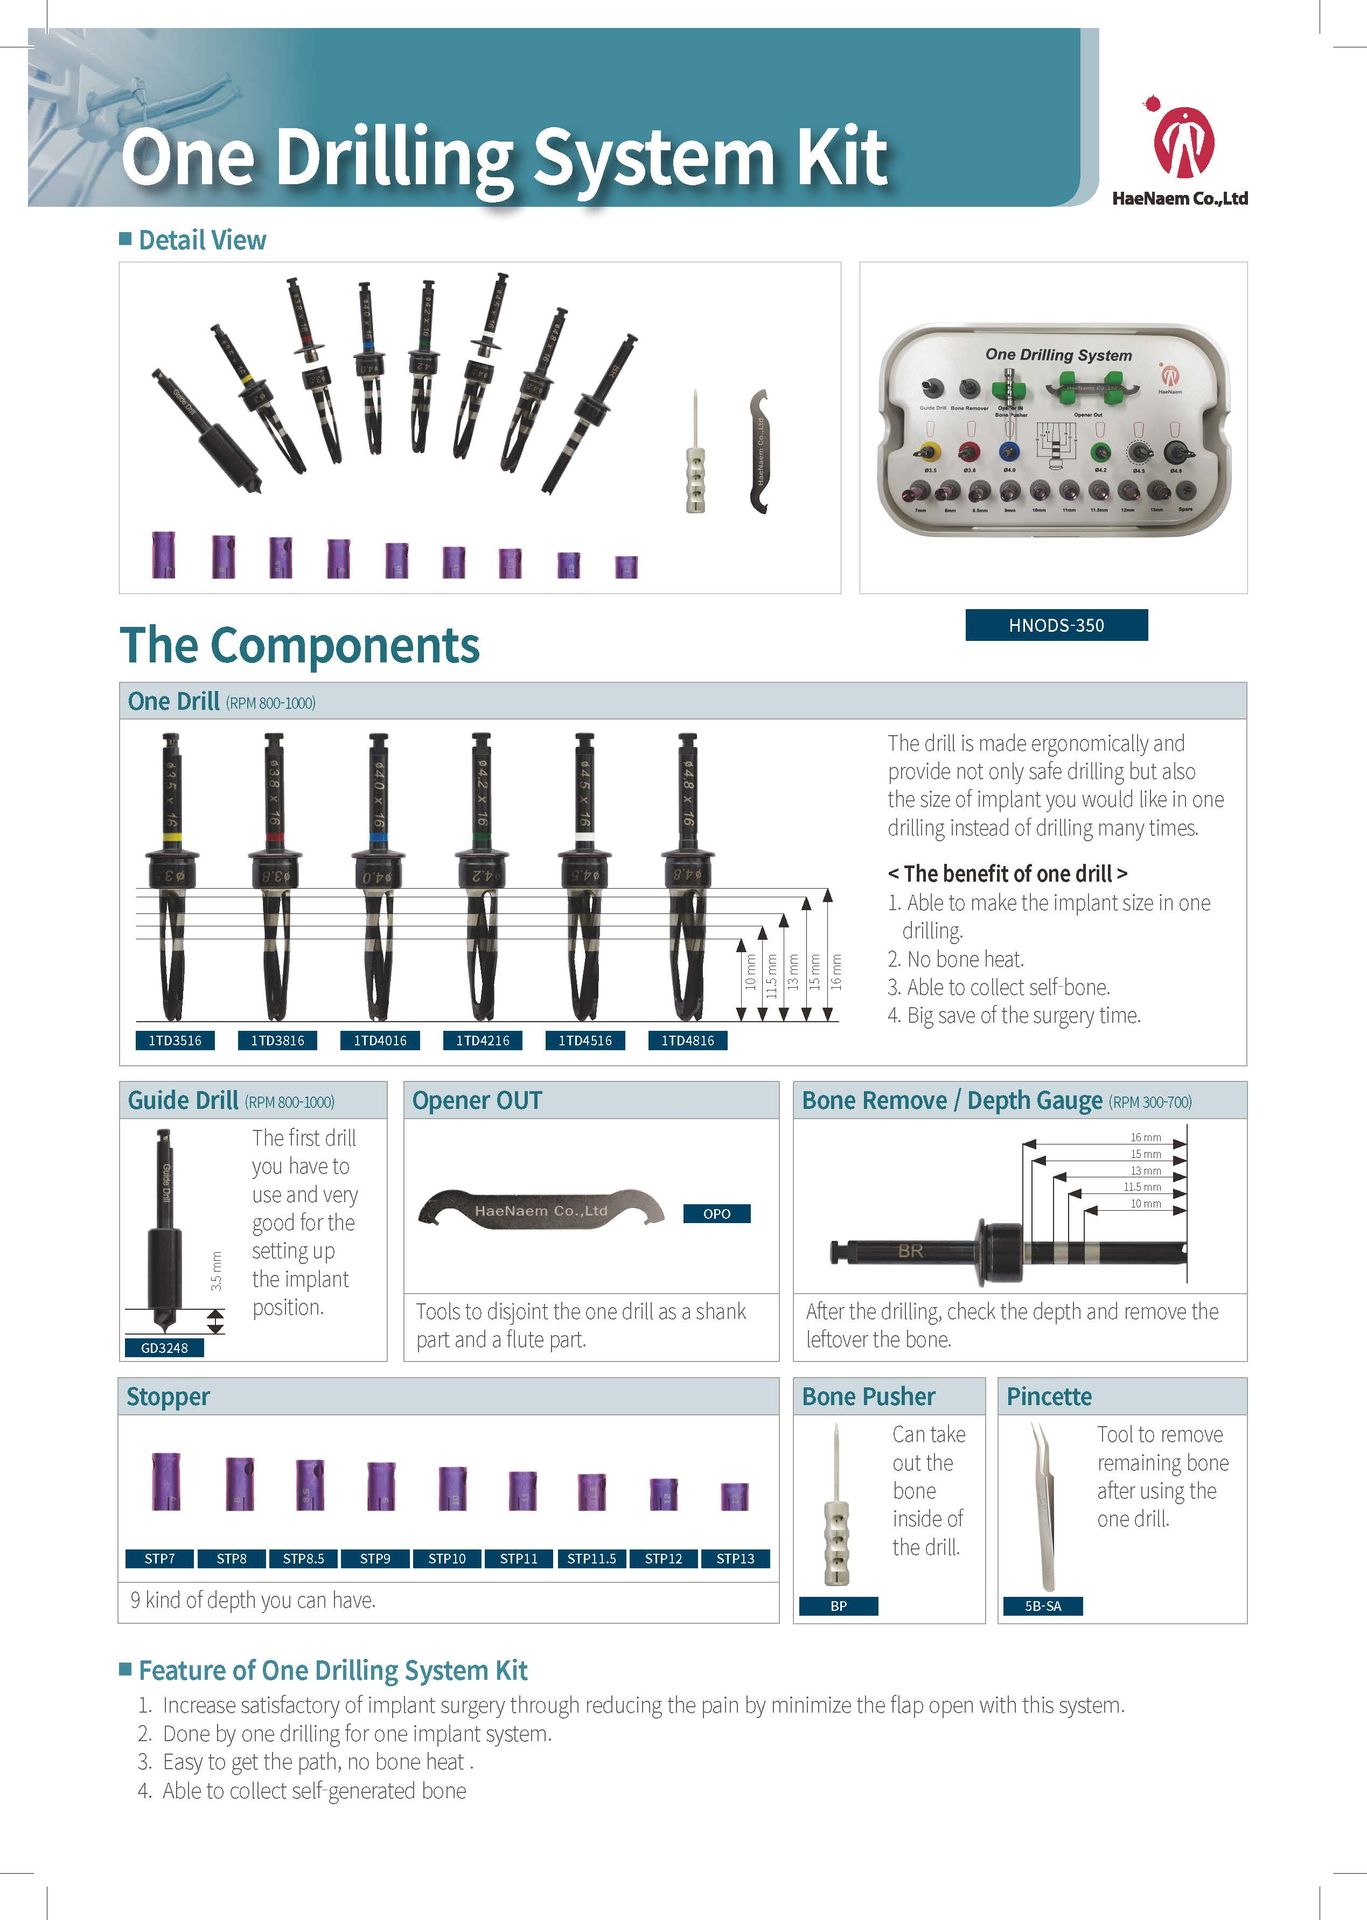
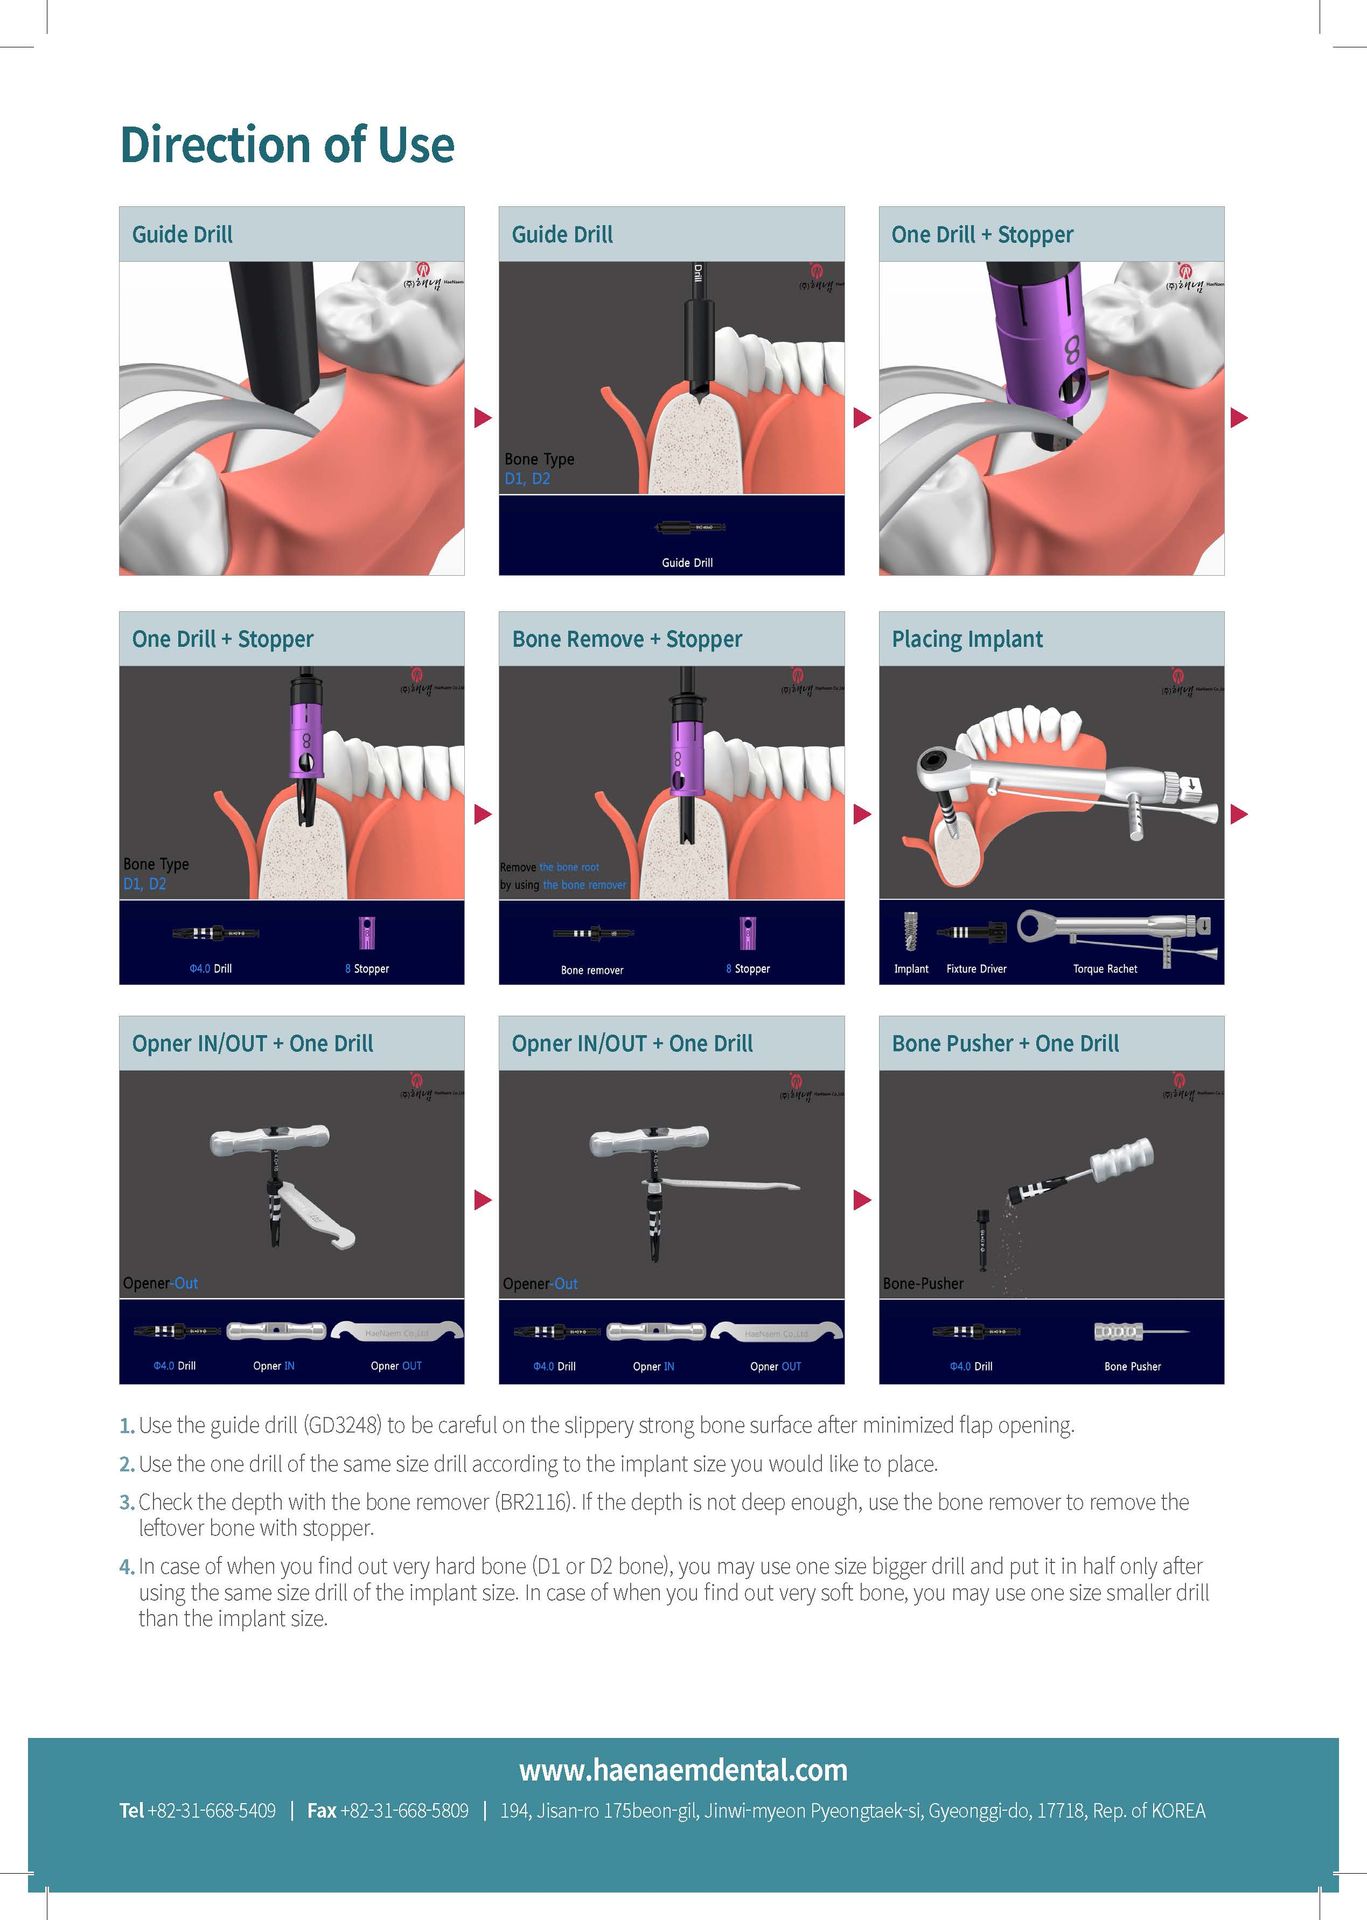
One Drilling System Kit
One Drilling System Kit has an innovative design and optimizes the surgical stage. With cylindrical shape, they have active tips with high cutting efficiency and excellent stability. Its parallel body contains straight flutes that help in irrigation and bone tissue collection.The Components:
- One Drill (RPM 800-1000): The drill is made ergonomically and provides not only safe drilling but also the size of implant you would like in one drilling instead of drilling many times.
The benefit of one drill:
- Able to make the implant size in one drilling.
- No bone heat.
- Able to collect self-bone.
- Big save of the surgery time.
- Guide Drill (RPM 800-1000): The first drill you have to use and very good for setting up the implant position.
- Opener OUT: Tools to disjoint the one drill as a shank part and a flute part.
- Bone Remove/Depth Gauge (RPM 300-700): After the drilling, check the depth and remove the leftover bone.
- Bone Pusher: Can take out the bone inside of the drill.
- Pincette: Tool to remove remaining bone after using the one drill.
- Stopper: 9 kinds of depth you can have.
Feature of One Drilling System Kit:
- Increase the satisfaction of implant surgery by reducing the pain by minimizing the flap open with this system.
- Done by one drilling for one implant system.
- Easy to get the path, no bone heat.
- Able to collect self-generated bone
The direction of Use:
- Use the guide drill (GD3248) to be careful on the slippery strong bone surface after minimized flap opening.
- Use the one drill of the same size drill according to the implant size you would like to place.
- Check the depth with the bone remover (BR2116). If the depth is not deep enough, use the bone remover to remove the leftover bone with a stopper.
- In case of when you find out a very hard bone (Dl or 02 bone), you may use one size bigger drill and put it in half only after using the same size drill of the implant size. In case of when you find out very soft bone, you may use one size smaller drill than the implant size.
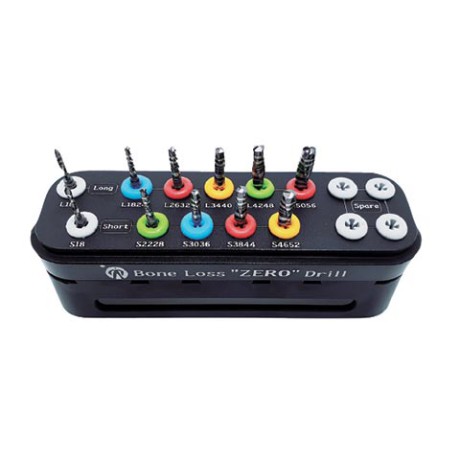
Total Bur Kit
Total HaeNaem Bur Kit is used for cutting hard tissues - tooth or bone. Total HaeNaem Burs are made of steel, stainless steel, tungsten carbide and diamond grit.
There can be a bewildering range of dental burs in any dental catalogue, but for basic veterinary use only a few burs are needed.
These kits often come in a custom bur block and the burs included are often selected by a noted clinician.
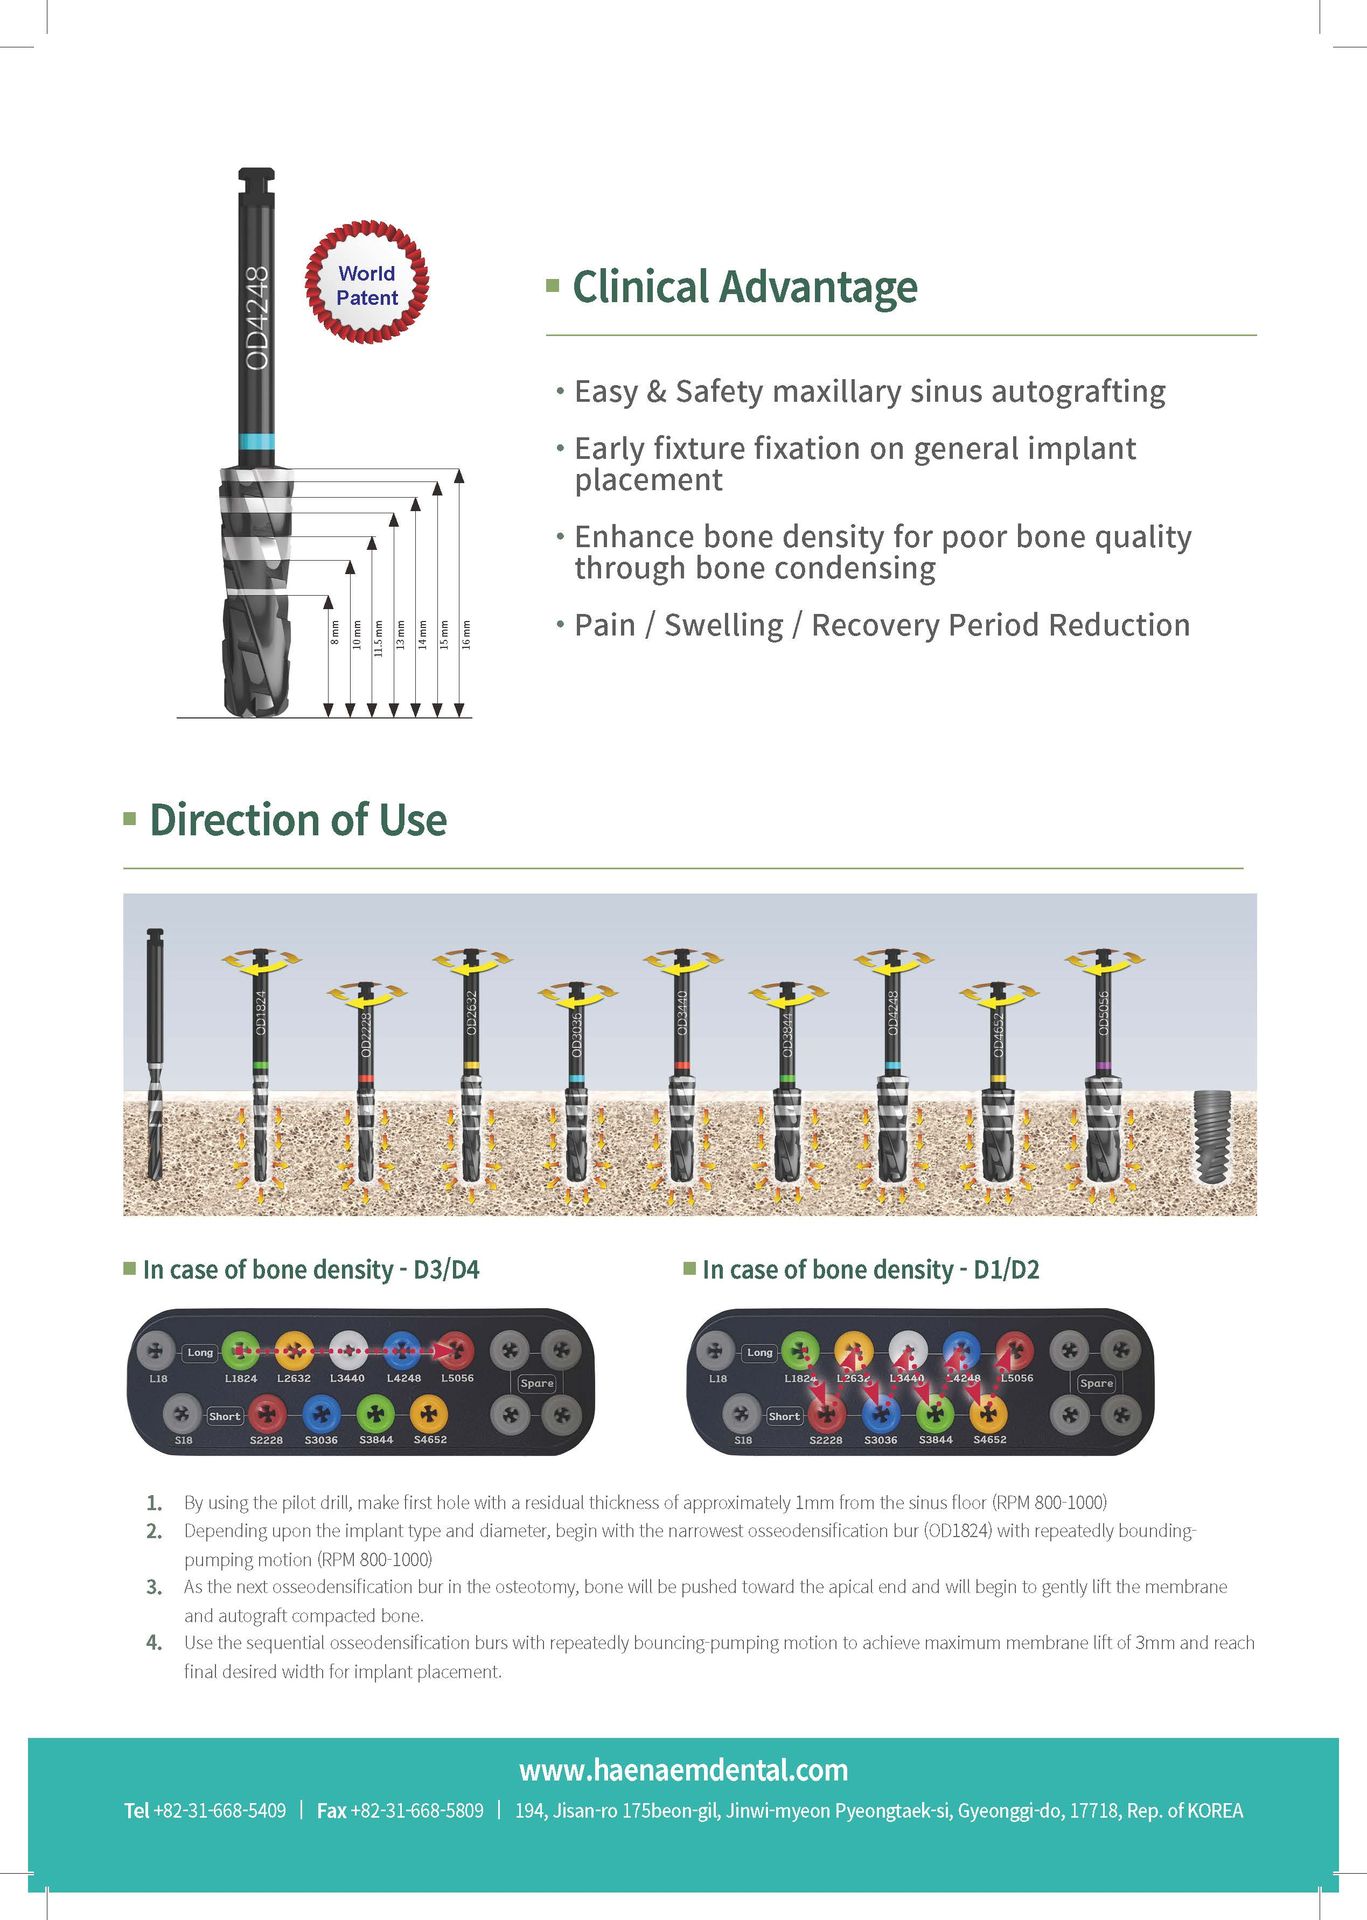
When drilling with the world-patented bone densification drill “Haenambur”, no bone loss or overflow occurs.
POINT VIEW:
- Maxillary Sinus Autografting is secure only by Drilling
- Improves bone density from D4 to D2 which is weak due to drilling
- Excellent Ridge expansion effect only by drilling
- Maximize the benefits of the procedure with two special drills, the Maxillary Sinus lifting drill and the bone extension drill
- Safe surgical operation due to the forward direction drilling like the existing drill direction is possible
The components:
- Pilot Drill (RPM 800-1000): Making first hole to the point of perforation before using osseodensif ication burs
- Expander 20 Drill (RPM800~1000)
- Osseodensification Bur (RPM 800-10001): By using clockwise direction, perform general drilling in a bouncing-pumping motion with copious irrigation
- SINUS 10 Drill (RPM800~1000)
Clinical Advantages:
- Easy & Safety maxillary sinus autografting
- Early fixture fixation on general implant placement
- Enhance bone density for poor bone quality through bone condensing
- Pain I Swelling I Recovery Period Reduction
Direction of Use:
1. By using the pilot drill, make first hole with a residual thickness of approx imatelylmm from the sinus floor (RPM 800-1000)
2. Depending upon the implant type and diameter, begin with the narrowest osseodensification bur (001824) with repeatedly bounding pumping motion
(RPM 800-1000)
3. As the next osseodens ification bur in the osteotomy, bone will be pushed toward the apical end and will begin to gent ly lift the membrane and autograft compacted bone.
4. Use the sequential osseodens ification burs with repeatedly bouncing-pumping motion to achieve maximum membrane lift of 3mm and reach f inal desired width for implant placement
Based on the experience and technology of manufacturing products of domestic implant companies leading the global market, The Haenaem bur kit is a kit that can be done with osseodensification, bone width expansion, maxillary sinus autogenous bone elevation.
The characteristics of the use of the haenaem bur Kit are that the bone expansion and maxillary sinus lift bur are separated for use to maximize the advantage, and the conventional driller who is familiar with forward drilling does not need to change the implant engine setting and eliminates mistake caused by the rotation direction.
Summarize the advantages of the haenaem Bur Kit :
First, it is possible to increase the Bone quality by the osseodensification , even if the bone quality is not good, it can accelerate the loading time. Second, it is possible to perform safe surgery by reducing pain after small swelling surgery with autologous bone graft through Crystal Approach. Third, it is possible to expand the bone safely by using a drill specialized in the narrow width of the mandible.
Fourth, in many cases where extraction and healing are insufficient, drilling alone can obtain a problem, so that fixing can be safely obtained when planted in septum.

Bone Expander Kit:
Increasing satisfaction of implant surgery through reducing the pain by minimizing the flap open with this system.
It is very safe and easy to place an implant in a location that requires expansion of the septum by using a stopper.
The Components of Bone Expander Kit
- SAW Cutting Drill
- Straight Drill
- Ratchet Wrench
- Bone Expander Drill
- Square Handle
- Adapter
- Splitter
Our References
We are in good company.